When you decide to choose a proper CDN for your website, there are many popular services to consider. In this article, we will discuss what is Cloudflare and how to install Cloudflare on WordPress in 4 steps.
Once you decide to start your online business, you need to choose the best WordPress website design, perform domain registration and purchase a web hosting service with high quality.
Maybe you need a server hosting to host your website that will enhance your website performance.
But if you need high availability for your website, choosing a CDN would be a great choice of web hosting services. This global service will help you to deliver your website content to any geographical locations around the world.
Now let’s see what is CDN and why should we choose this service.
What is CDN?
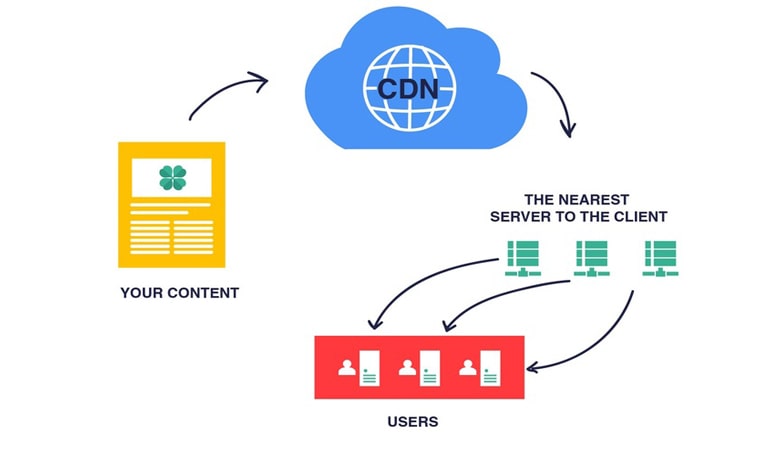
If you need better performance, high security, reliability and availability for your website content, you need to have a powerful Content Delivery Network (CDN) to deliver your website content to users who are searching for you from any location around the world.
You can get more information about CDNs and how they work in our recent article. (link to the CDN article)
But do not forget to learn more about the most popular CDN around the world. Cloudflare has the most share of CDNs in the market. Let’s check its features more and see what is Cloudflare used for.
What is Cloudflare?
Cloudflare is one of the most popular CDNs with the largest network around the world. By locating many servers in each geographical location, it can answer users’ requests from any location. Cloudflare CDN is able to handle all requests which a website receives and there wouldn’t be any unavailability for website contents.
Now it’s time to see what does Cloudflare does and check it’s featured in more detail.
How does Cloudflare work?
Cloudflare helps your visitors to deliver your website content more quickly by storing a copy of static files on each server closer to your visitor’s locations. It will cache resources such as images, JavaScript and CSS. You do not need any configurations to determine which files to be cached. One of the most prominent features of Cloudflare is that it does compression for every request.
It has many other features that we will discuss in the following.
Benefits of Cloudflare

1.High Security

Cloudflare will distinguish any potential threats and malicious traffic and stop them before reaching your main web server. DDoS is one of these threats that send many requests from different locations. Cloudflare blocks DDoS attacks and protects your website content.
2.SEO Improvement

Every website needs a proper Search Engine Optimization in each browser. By applying SEO rules on your website elements, every browser and especially Chrome give high rank to your website. Cloudflare CDN increases your SEO quality and helps your website to be seen more in SERP results.
3.Performance Improvement

By filtering your website traffic, your hosting resources have the opportunity to deliver your website content to the real users with high speed. Also, the caching system of Cloudflare speeds up your website load process by optimizing your content.
4.Free

Cloudflare is a free content delivery network to get started. You can’t find this feature in other CDNs and you can use this technology just by paying a lot of money.
5.Save Hosting Bandwidth
Cloudflare caching system helps you to save your hosting bandwidth. Cloudflare serves the cached content of your website to users and prevents them to utilize the bandwidth which you had provided on your hosting plan.
6.Fast DNS Changes
One of the popular features of Cloudflare is that it can control your DNS. So when you transfer your website to a new host, this process will be continued in some minutes.
How to setup Cloudflare for WordPress?
If you are looking for an introduction to see how to install an official Cloudflare plugin on your WordPress website, here we explain the whole process you need to pass in order to setup Cloudflare on your WordPress website.
Choosing the best WordPress hosting is one of the main elements to improve your website performance.
Step 1: Add your site to Cloudflare
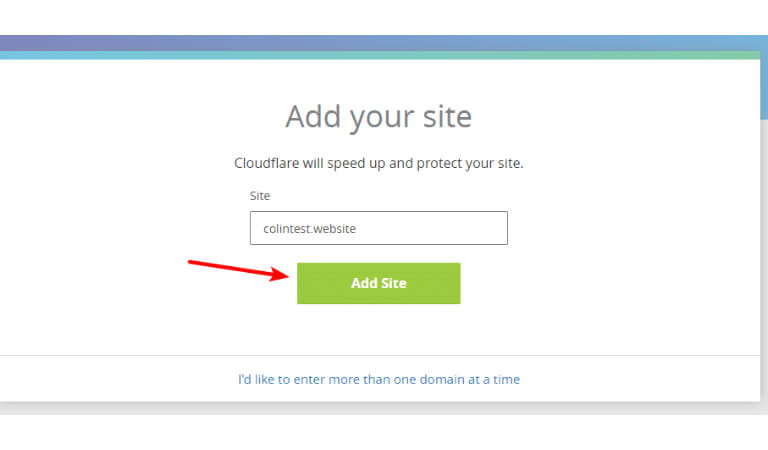
At first, you need to create an account on the Cloudflare website and add your website into its platform. In order to add your website, enter your domain name and click on the “Add Site” button.
In this step, by facing the page with the title of “We’re querying your DNS records”, click on the “Next” button to continue the process.
You will be offered by various plans of Cloudflare services, and you can select the free one and click on the “Confirm Plan” button.
Step 2: Verify DNS Records
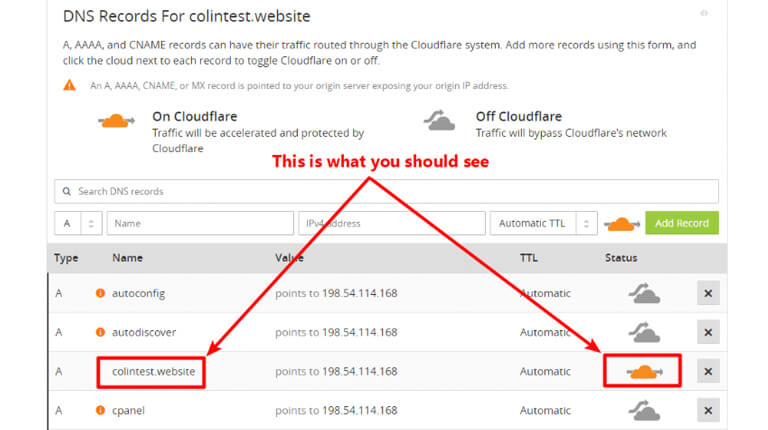
Here you are asked to verify your DNS records. When you do so, there should be an orange cloud dedicated to the Cloudflare brand in front of your domain name.
When you become sure about your DNS records verification, click on the “Continue” button.
Step 3: Change your nameservers to Cloudflare nameservers
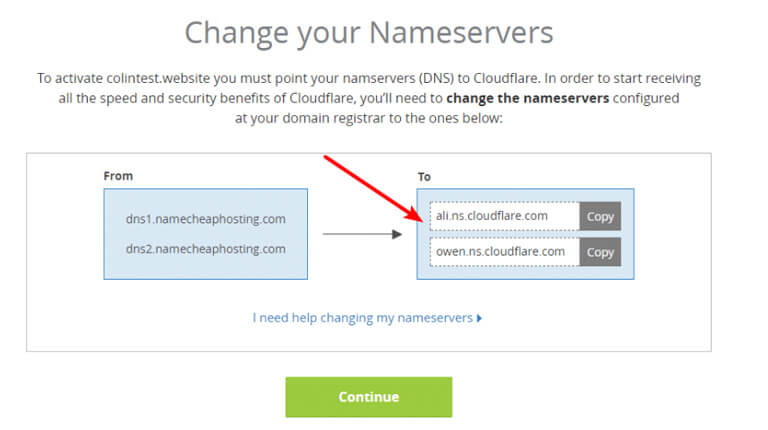
Cloudflare should manage everything at a DNS level, So you need to verify your nameserver.
On the page with the title of “Change your Nameserver”once you applied the requested process, click on the “Continue” button.
You should wait till some minutes up to 24 hours that your new nameservers will be applied.
Note that the process will be done successfully and status is changed to “Active”.
These are the basic configurations process of Cloudflare. Now it’s time to see how to install official Cloudflare plugin on your WordPress website.
Step 4: Install, activate and sign in to your Cloudflare account
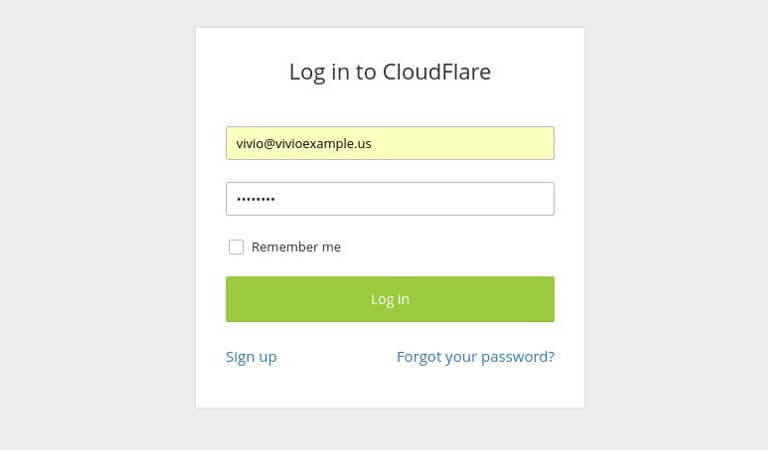
Search for the official plugin of WordPress, install and then activate it. Then go to the plugin setting and sign in to your account which you had already created in the Cloudflare website.
Here you need to enter your email and API key. Find your API key within your profile and the API key section. Paste it into your plugin and click on “Save API Credentials” and then click the “Apply” button on the homepage of this plugin within your WordPress.
Now the process of Cloudflare configuration has been done, but here are some more tips to use Cloudflare on WordPress:
- If you have installed any plugin to minify your website codes, you should disable this feature in the Cloudflare plugin in the “speed” tab.
- If you have installed an SSL on your site, you should you through the “Crypto” tab within the Cloudflare plugin and choose “Full SSL” instead of “Flexible SSL”.
Now we know what is Cloudflare, it’s benefits and the way how to set up Cloudflare for WordPress. There are many tips to see how does Cloudflare work. Cloudflare would be a suitable choice for your website because every user in any location can visit your website in no time. This is the most essential factor that can convert your visitors to loyal customers.

Leave a Reply