
Plesk, Inc., a Russian company, created Plesk and made it publicly available in 2001. Plesk was sold to SWSoft, which changed its name to Parallels in 2008. After being purchased by Oakley Capital, it was made its own entity in 2015. Plesk is a commercial hosting automation software that automates web hosting servers. It was developed for Linux/Unix as well as Windows-based hosting service providers.
Plesk is an excellent control panel system for dedicated servers and VPS server, as its menu is easy to use. Plesk makes it so simple to administer a server that even someone with no previous experience can use it. Administrators can create site and client templates. This is basically allocating resources to domains and clients. Plesk can also be used to automate the administration and management of websites. Plesk automates many tasks and processes on one or more servers.
Plesk integrates support for Content Management Systems, which include Drupal, Joomla, WordPress, and Joomla. It has also included other software like Docker, multiserver management and framework environments such as Node.js and Ruby on Rails. Plesk is compatible with multiple Linux/Unix environments, as well as Microsoft Windows. Plesk supports MySQL, PostgreSQL and MSSQL Server as well as MSSQL Desktop Engine and Apache Tomcat Java platform servers and ColdFusion servers. In this article, we’re going to discuss how to use the Plesk control panel, and you can share this article with your friends as a complete Plesk tutorial is available.
How Do I Use the Plesk Control Panel
Logging in as the Server Administrator
You will receive several forms when you log in to Plesk first as the server administrator. These forms will collect your personal information and assist you with setting up Plesk’s initial configuration. These are the steps:
- Plesk license agreement. To proceed, you will need to agree to it.
- Initial configuration. The following steps are required:
- Please enter the complete hostname of your server.
- Choose the default IP address.
- Separate IPs from the server into dedicated and shared addresses.
- Enter the new Plesk administrator password.
- This form contains your personal information. To proceed, you will need to complete it.
- Plesk interface selection. Select the purpose of the server and choose from one of the Plesk interface options.
- Power User view: This interface is for web administrators who manage the websites of customers.
- Service Provider view: This interface is for shared hosting providers who plan to sell hosting services to customers who manage their own websites.
- Provide your Plesk license key. Upload a.ZIP or.XML archive or specify the activation code.
- You can configure your first subscription if you have selected Power User view. The following information will be required:
- Domain name
- IP address
Plesk User Interface Explained

Plesk users have different usage needs. The provider might need to configure server-wide settings and set up service plans, but the customer may be required to create a database or modify PHP settings for their domain. Plesk offers two panels to accommodate different parties.
- The Customer Panel: Focuses on hosting web operations. It features tools that allow you to manage your websites and mailboxes. This panel is for hosting customers.
- The Power User View: Contains all of the tools in the Customer Panel as well as tools that allow server-wide settings to be managed. This view is ideal for web studios managing websites for their customers and server administrators who host their websites.
Both panels permit the management of subscriptions.
This Plesk guide is for web designers and shared hosting customers. We will concentrate on the Power User view.
- This section shows the current subscription selected and the name of the user currently logged into. You can modify the settings of your user account to change what subscription you want to manage.
- This section includes the Help menu. The Help menu allows users to access context-sensitive online help and view video tutorials.
- This section contains the Search area.
- This section contains the navigation pane, which helps organize the Plesk interface. The tools are organized by function. For example, the tools that allow users to manage to host web settings can be found on the Sites & Domains webpage, while those that enable users to manage email accounts can be found on the Email page. This is a brief description of each tab and its functionality.
- Websites and Domains: These tools allow customers to add, remove, or modify domains, subdomains, as well as domain aliases. These tools allow customers to set up web hosting, manage their database users and create and modify databases, as well as secure their websites using SSL/TLS certificates.
- Mail: These tools allow customers to manage their mail server settings and add or remove mail accounts.
- Applications: These tools allow customers to install and manage many web applications easily.
- Files: This item includes a web-based file management tool that allows customers to upload content to their website and manage files on their server.
- Databases: This item allows customers to create or manage existing databases.
- Statistics: This item contains information about traffic usage and disk space, along with a link to web statistics which gives a comprehensive overview of site visitors.
- Server: This item is visible only to the server administrator. This item contains tools that allow the administrator to set up server-wide settings.
- Extensions: This item allows customers to access extensions that have been installed in Plesk and manage them.
- Users: These tools allow customers to create and delete user accounts, which enable others to log into Plesk.
- My Profile: This item can only be viewed in the power user view. This is where you can view and edit your contact information and other personal data.
- Account: This item can only be accessed by shared hosting customers through their Control Panel. This item contains information about resource usage, permitted hosting options, and granted permissions. These tools allow customers to access and update their personal information and backup their subscription settings.
- Docker: If the Docker Manager extension has been installed, this item will be visible. This section allows you to run and manage containers that were created using Docker images.
Furthermore, in this Plesk tutorial, we will explain how to do many common tasks later. They will instruct the user to open one tab and then click on one of the controls. The most likely reason a tab or control is missing from the panel is that it is not available for subscription. Customers in this situation should contact their provider immediately.
Adding Domains
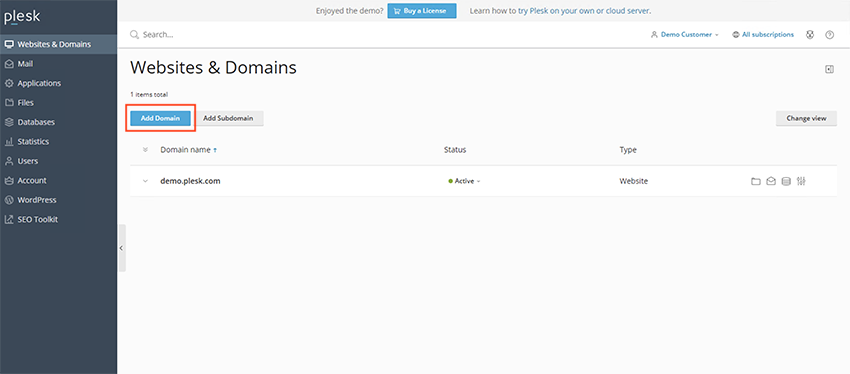
You can add more domains to a subscription if your subscription allows. All domains in the same subscription will have access to the resources of the newly added domain. The newly added domain will still be part of the subscription’s resources. It will have its own web hosting, DNS settings, databases and mail accounts.
Adding a domain can be very helpful in the following situations:
- You would like to create a new website that is not related to the existing websites. It should have its own name, web content and mail accounts. You will need to register a second-level domain name if you don’t already have one. A second-level domain name is composed of a proper domain name and a top domain suffix (known as TLD, for short). It is an example domain. Your provider may allow you to register a domain. You can also purchase one through a domain registrar you choose.
- You wish to transfer a domain that is already hosted by another provider. You may need to contact the domain registrar in order to change the authoritative names servers for the domain name you wish to transfer to Plesk. Website content must also be transferred. You can upload it via FTP or the File Manager, as described in the Uploading Article section.
- You wish to create a website that will redirect visitors to another website. You can find some reasons to set up redirection in the Adding domain aliases section. A separate domain name is required for each domain alias.
Go to Domains Menu > Add Domain.
Adding Subdomains
You can create subdomains (or third-level domains) for each domain if your subscription allows. Subdomains share all resources of the subscription with all subdomains and domains that are part of the same subscription. Each subdomain can, however, have its own web hosting or DNS settings.
Adding a subdomain can be very helpful in the following situations:
- Your website structure should be logically organized. You can, for example, display information about your company at game.example.com or make your web store available at store.example.com.
- If you want to host many websites but don’t want to buy a domain name for each one, you can host your personal websites with addresses such as me.example.com or jane.example.com.
Go to Websites and Domains > Subdomain.
Adding Domain Aliases
You can create domain aliases if your subscription allows. Domain aliases don’t have content; they redirect to another website whenever visited. You will need to register a second-level domain name if you don’t already have one. Your provider may allow you to register a domain. You can also purchase one through a domain registrar you choose.
Adding domain aliases can be very helpful in the following situations:
- No matter what TLD is used, you want visitors to be able to find your website. You can register exemple.net or instance.org and then use them as domain names to point to your website.com.
- Visitors who misspell your domain name will not be able to find your website. You can, for example, register exmaple.com to be used as a domain name pointing at your website example2.com.
- It is possible to change your website’s domain name, but you also want people who used your old domain name to still be able to find your website. To change your website’s domain name, for example, example.com. However, visitors who used your old domain name can still find your website. The example.com domain alias can point to your new website otherexample.com.
Go to Websites and Domains > Create Domain Alias.
Setting Up Custom Error Pages
A special error page will be displayed if the web server encounters an error. This page includes the error code. These pages are usually generic and not informative by default. You can also replace standard error pages with custom ones. This section of the Plesk admin guide can be crucial for some as they would want to set up custom error pages for their server.
Linux: Custom Error Pages
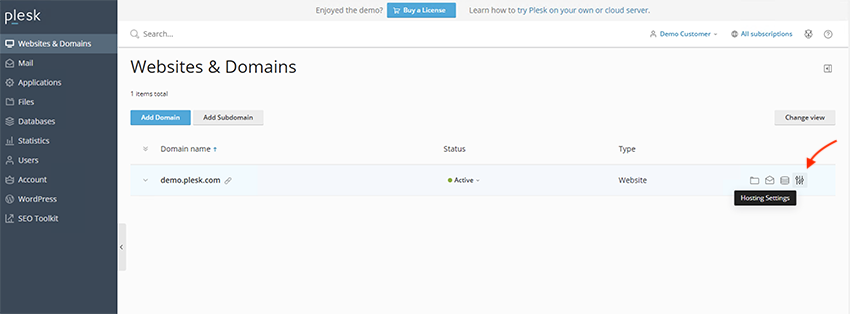
Go to Domains & Websites > Hosting Settings.
Click OK and select Custom error documentation.
- Connect to your FTP account and navigate to the error_docs directory.
- Replace or edit the files. Make sure you keep the correct file names.
- 400 Bad File Request – bad_request.html
- 401 Unauthorized – unauthorized.html
- 403 Forbidden/Access denied – forbidden.html
- 404 Not Found – not_found.html
- 405 Method Not Allowed – method_not_allowed.html
- 406 Not Acceptable – not_acceptable.html
- 407 Proxy Authentication Required – proxy_authentication_required.html
- 412 Precondition Failed – precondition_failed.html
- 414 Request-URI Too Long – request-uri_too_long.html
- 415 Unsupported Media Type – unsupported_media_type.html
- 500 Internal Server Error – internal_server_error.html
- 501 Not Implemented.
- 502 Bad Gateway – bad_gateway.html
- 503 Service Temporarily unavailable – maintenance.html
After the web server is restarted, it will begin using your error files.
Windows: Custom Error Pages
Go to Domains & Websites > Hosting Settings.
Click OK and select Custom error documentation.
- Click Virtual Directory to open the Error Docs tab. This will display the error document list for the root web directory. These documents are applicable to all pages on the site. Navigate to the directory to modify error pages for that virtual directory.
- Click on the error document that you wish to modify.
Select Default in the Type Menu to use this default document.
To use a custom HTML file located in error_docs in the domain’s virtual host directory, select and enter the file name into the Location box.
Select this option to use a custom HTML file located in another directory than error_docs. URL From the Type Enter the path to your document into the menu Localization field. The path must be relative to the virtual host root (that’s, the %plesk_vhosts%). \httpdocsfolder).
You have, for example, created a file called forbidden_403_1.html. Then you saved it to the my_errors directory in the httpdocs directory. To use this file as an error document, you need to type the following path into the Location field: /my_errors/forbidden_403_1.html.
Set Up HTTP 301 Redirection
Plesk offers two methods to set up search engine-friendly HTTP301 redirection between one website and another. This allows search engines to preserve the ranking of the website visitors are redirected to. Search engines will recognize both the example.com and www.example.com versions of an HTTP 301 redirection. Instead, you can use HTTP 302 redirection. The non-www and www versions will be treated differently. Rankings will therefore be divided between them.
You can set up HTTP301 redirection with domain aliases by going to Sites & Domains > Add Domain Alias.
You can set up HTTP301 redirection with forwarding hosting type by going to Sites & Domains > Add Domain.
Configuring the Preferred Domain
A website can be available with both a URL that has a www prefix (such as www.example.com) and one without it (such as example.com). We recommend you choose one and redirect all visitors to the other. The non-www version will typically be accepted by all visitors. For example, if the non-www version is set up (example.com), visitors will be redirected to example.com regardless of whether they have typed www.example.com into their browser address bar.
Go to Websites and Domains > Hosting Settings.
Setting the Default Homepage
To set a new default homepage in Linux, follow the steps below:
Go to Sites & Domains > Apache & Nginx Settings.
In the Index files section, select the Enter custom option. Select the file name(s) that will be used for the default page. Multiple file names can be specified. Separate them with white space. If you specify index.htm index.php, the web server will serve as your default page. index.php is served if the file with this name is not found.
To set a new default homepage in Windows, follow the steps below:
Go to Domains & Websites > Internet Settings.
Select the Option in the default documents section. You can add or remove files from the list. The default page file will be searched by the web server starting at the top of the list and working its way down. If you have “index.html” and “index.php” below it, the webserver will serve index.htm. index.php will be served if the file with this name is not available.
Document Root Directory
Each domain created in Plesk with website hosting is given its own directory on the server’s File System. The default path to the directory is:
- On Linux: /var/www/vhosts/
- Windows: C:Inetpubvhosts
This folder is the document root directory. It is the folder that contains all domain web content. It is, by default, the httpdocs directory, but Plesk allows you to change it.
You can change the directory root by going to Domains & Websites> Hosting Settings.
Selecting PHP Version
You can change the PHP version by going to Domains & Websites > Host Settings and selecting the appropriate version from the PHP2_ menu.
Configuring PHP Settings
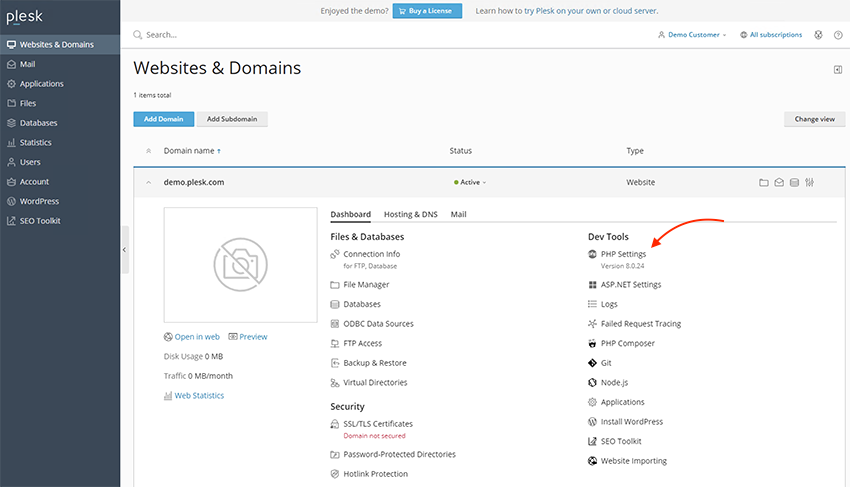
You can change the PHP settings by going to Domains & Websites > PHP Setting.
Selecting ASP.NET Version
You can change the ASP.NET version by going to Domains & Websites tab > Hosting Settings and selecting the appropriate version from the Version menu next to the Microsoft ASP.NET Support checkbox.
MIME Types
Multipurpose Internet Mail Exchange types (MIME) tell a web browser how to handle files from the server. A web browser will request the MIME type when it requests an item from a server. Some MIME types can be displayed within the browser, such as graphics. Some MIME types, like graphics, need to be displayed in the browser. Word processing documents, however, will require external applications.
You can set custom MIME types to control which applications will open a specific type of file on the client’s side.
For more information on how to configure MIME types in Plesk Linux, visit Websites and Domains > Apache Settings.
For more information on how to configure MIME types in Plesk Windows, visit Websites and Domains > Internet Settings.
Next, specify MIME types that associate file extensions with file types. Example: “text/plain.mytxt”
Uploading Files
Plesk offers two easy ways to upload content to your domains
- Uploading content using FTP. An FTP client program allows you to connect to your server and upload your content.
- Use the File Manager to upload content. Plesk allows you to upload and modify content via a web interface.
FTP Upload of Content
These are the details you will need to connect to the FTP server:
- FTP server address: Your domain name is your website’s Internet address.
- FTP username: It’s identical to your system username. Go to Websites and Domains > Hosting Access.
- FTP password: It’s identical to your system password. You can find your system password at Websites and Domains > Hosting Access. The Password password can be reset.
A program called FTP client is also required. Many FTP clients are available for free on the Internet, such as FileZilla and FireFTP. To connect to FTP servers, download and install the client. For instructions on installing and configuring the FTP client, please refer to these instructions.
You can change your FTP username or password by going to Domains & Websites > Hosting Access.
Next, enter a new password and username, System User.
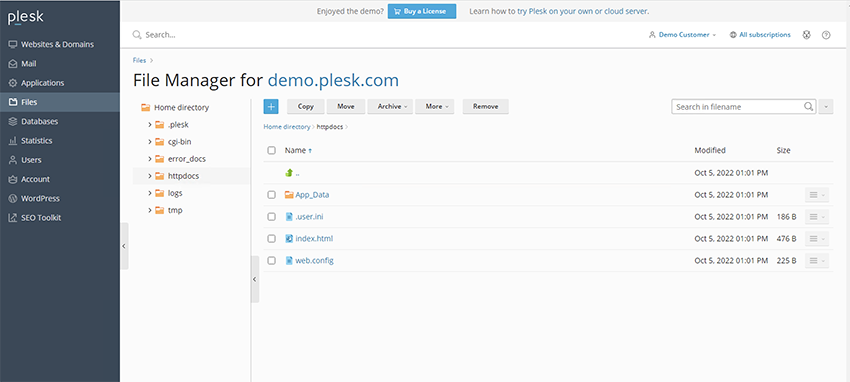
Upload Content Using the File Manager
Using the default File Manager is the most important section in this Plesk user guide, as most people tend to use the default File Manager provided by Plesk.
Go to files to upload content. Navigate to the folder where you want to upload it, click Upload and select the file to be saved. Click Open.
It is best to upload multiple files at once. To save time, add them to an archive and upload them archive. At the moment, ZIP archives are not supported.
Go to Files to download a file. Navigate to the location you wish to download the file from, then click the hamburger icon beside the file and choose Download.
Go to files to compress files. Navigate to the folder or file you wish to compress and select the checkbox beside it. Click Add To Archive.
Go to files to extract files from an archive. Check the box next to the file that you wish to extract, and then click extract files.
Go to Files to edit files. Navigate to the location of your file and then do one of these:
- Click the hamburger icon beside the file that you wish to edit and then select Edit In Code Editor.
- Click the hamburger icon beside the file that you wish to edit and then select Edit In HTML Editor.
- Click the hamburger icon beside the file that you wish to edit and then select Edit In Text Editor.
How to Manage Mail Accounts in Plesk Control Panel
Mail service allows Internet users to exchange email messages. Plesk can be used as your mail server. You can also create and manage mail accounts, as well as perform a variety of mail-related operations. These operations include changing the password of a mail account and enabling automatic replies.
To create a mail address:
Go to Email > Register an Email Address.
You can access your mail account via webmail
- Visit the URL webmail.example.com in a Web browser. Example.com is your website’s Internet address. When asked, enter your full email address (e.g., [email protected]) and the password.
- Log in to Plesk and go to Mail. Click the icon next to the email address that you require.
You can access your mail account via a mail client
Start a mail client program by installing it on your computer. You should usually specify the following settings in mail client programs:
- Username: In this field, please enter your complete email address. [email protected].
- Password: Here, enter your password for your email account.
- Mail server protocol: This property determines whether you want to store copies of messages on your server. Select the option to keep copies of messages on the server. You can choose POP3 if you don’t want them to be saved on the server. If SpamAssassin is turned on on your server, you can also select IMAP to train SpamAssassin’s spam filter on any email messages you receive.
- Incoming mail server (POP3/IMAP): Here, enter your domain name. example.com. 110 is the default POP3 port. The default IMAP port number is 143.
- Outgoing mail server (SMTP): Here, enter your domain name. example.com. 25 is the default SMTP port. Indicate that authentication is required for the server.
Manage DNS Records Management
Domain names are human-readable Internet addresses that point to a website. The Domain Name System (or DNS) is responsible for translating human-readable names into machine-readable ones. Your website’s DNS settings must be correct in order to ensure that your services work properly. Your domain could become unavailable, or your mail server may not reach you. Plesk can serve as a primary and secondary name server for domains. The interface allows you to modify DNS settings. Plesk can be used to disable third-party DNS services for domains.
DNS Records Modification and Adding
Plesk creates a DNS Zone for each domain name according to the settings set by your service provider. Automatic configuration should work well for domain names. You can make custom modifications to the domain name zones if you are using the Plesk NS server.
Go to Websites and Domains > DNS Setting to view resource records for a DNS zone.
Go to Websites and Domains > URL Settings, then click Create Record.
You can modify the properties of resource records by going to Domains & Websites > CSS Settings and clicking the record.
There is also a Start of Authority record. This record shows that the DNS name server responsible for the domain’s DNS zones is this record. This record also includes settings that influence propagation information about the DNS Zone in the Domain Name System.
Use External DNS Servers
You have two options if you want to host websites with your account but not use Plesk for your primary NS servers:
- Plesk can be used as a secondary name server. This option is for you if your standalone name server acts as a primary name server for your website.
- Plesk will disable DNS for your domain. This option is for you if your website has authoritative primary and second name servers.
Go to Websites and Domains > CSS Settings, then click Switch To Slave.
Go to Domains & Websites > DNS Settings, and click Switch To Master.
You can disable Plesk’s DNS service on a site that is served by an external name server by going to Websites and Domains > CSS Settings, then click Disable.
Web Applications Management
Web applications are software products that can be installed on websites in order to improve the user experience and add functionality. Plesk Applications vault contains a wide variety of applications that can be used in many different scenarios. They are easy to install from the Plesk interface and require very little effort.
Go to Applications > Installation or Instal (Custom) or Version.
Site Visit Statistics

You can enable or modify web statistics by going to Sites & Domains > Host Settings. From the Web Statistics menu, select the web stats software you wish to view graphical reports and charts of website visitors.
Go to web statistics Websites Domains > Web Statistics.
Disk and Traffic Usage Report
Statistics will allow you to view traffic and disk usage reports.
Backup Management
To protect against malicious attacks and accidents, it is a good idea to have backup copies of all website content. Plesk allows you to create backup copies and has the ability to restore them. You can create backups of content and configuration, such as website content, mail accounts and databases, and then restore them if necessary. Plesk backup files can be downloaded and uploaded, including older Plesk backups. Backups can be saved locally or remotely via FTP.
Backup of Accounts and Websites
Go to Account > Backup My Account and All Subscriptions to back up all data.
Go backup the websites that are related to a subscription. Account > Backup Websites.
To create a backup, click Backup.
Backups
Backups created in Plesk Onyx 17.0 or later cannot be restored.
You can choose which objects you want to restore from a backup. You can also restore a specific site, file, or database. You can restore only the objects that you wish to restore without overwriting others. If you want to only restore the DNS zone, for example.com, then there is no need to rebuild configurations for all domains.
Go to Account > Backup Websites or Domains & Websites > backup Manager. Click on the backup you need, then specify what to restore and click Restore.
How Do You Install a Website Using the Plesk Control panel

Create Your First Website
These steps will help you set up your first website.
- Register a domain.
- Plesk domains can be added.
- Make your own website.
Registering a Domain Name
The domain name is your business address. It is the address that customers use to find you online. Domain names that are easy to remember, short and easy to type are the best. example.com is an example of a domain. One of many domain registrars can help you register a domain name. Your hosting provider will often be able to help you register a domain name. Many web hosting services come with domain registration offers.
Plesk Domain Added
Your provider may have already added your first domain if you are a web host customer. Contact your provider if they haven’t. If you’re a web administrator using the Power User view, your first subscription was created during the initial Plesk setup. Plesk allows you to add a domain and upload content.
You will have the ability to add domains in the future. However, for this Plesk admin guide, the first domain will suffice.
Create Your Website
There are three options for creating content for your website. Each method has its pros and cons. Let’s take a look at each of these:
- Hire a professional designer: This guarantees that you will get exactly what you want. It is, however, the most costly. The web designer will give you the files that you need to upload to your hosting account.
- Use the Presence Builder: Plesk’s Presence Builder allows you to create websites via a web interface. To create a professional-looking website, you can use one of the templates provided.
- Create and manage a website using a CMS: These systems are versatile and offer a wide range of add-ons. CMS offers greater customization than Presence Builder but requires more technical knowledge from users.
Option A. Upload Content
You must upload your website content to Plesk if you created the website or hired a web designer. The website will then be available online. Plesk allows you to upload content using FTP or File Manager. You can choose which one works for you by following the instructions below.
FTP is used to publish a website
- Get an FTP client program. You can select any FTP client that you wish. FileZilla can help you choose the right FTP client.
- Use the FTP client to connect to your subscription server. These are the details you will need to connect:
- FTP server address: The FTP address should be ftp://your-domain-name.com, where your-domain-name.com is your site’s Internet address.
- FTP username: This username is the same as your system username. The system username may be different from the Plesk username. Open the Websites and Domains tab, then click Web Hosting Access. It will be under the Username. If you would like to change your system username,
- FTP password: This password is the same as your system password. To find out your system password, click Web Hosting access. The Password password can be reset.
- If you are behind firewalls, turn on the passive mode. For instructions on how to enter passive mode, refer to your FTP client documentation.
- Upload all files and directories to the httpdocs directory. CGI scripts should be placed in the cgi bin directory.
Use File Manager to Publish a Website
- Go to Domains & Websites > domain > File Management, and then to the httpdocs directory.
- Then click the + button to do the following:
- Click Upload File to upload one file. Locate the file and click OK.
- Click Upload Directory to upload one file or multiple files. Drag files and directories to the dashed box.
- Click Import file from URL to upload a file from another website or FTP service. Next, enter the URL of your file and click Import. For example, the URL can be https://example.com/image.png or ftps://user:[email protected]/example.tar.
Option b. Website Builder
Go to Websites and Domains> Presence Builder, then click Create Site.
Option C. Content Management System
You can create a website with a Content Management System or CMS by going to Applications > Installation.
Creating the Database
Databases are relational structures that store data. Modern web hosting requires databases to function. Most popular CMSs also require databases. Plesk is compatible with MySQL, MSSQL, and PostgreSQL database servers. It allows you to add, delete, access, and manage database users.
To create a user and a table:
Go to Databanks > Create a Database.
Login and Change Your Password
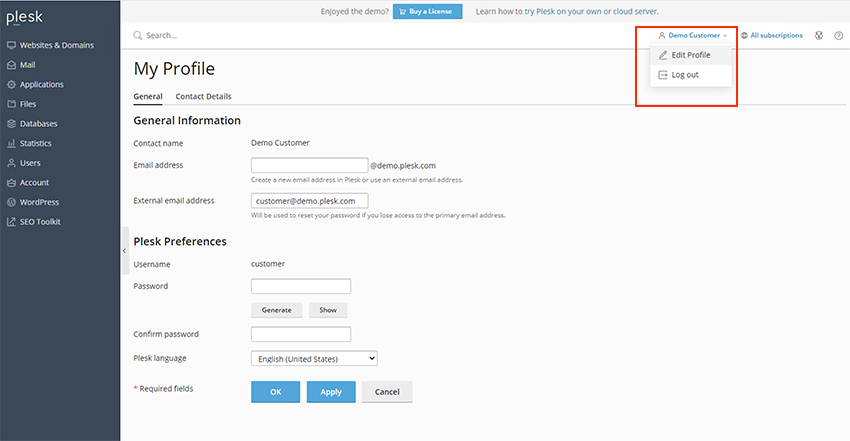
Your web hosting provider may have set your password to log into Plesk. Click Edit Profile to change your password.
After we have completed all tasks successfully, it’s time to log off of Plesk. Click Log Out.
Conclusion
In this Plesk guide, we covered most of the features that Plesk offers. Plesk is easy to use for end users of any experience level. The user-friendly interface, combined with the many extensions available, makes it simple to manage your VPS server or dedicated server. Plesk makes managing servers easy and saves time. Plesk automates website, email and database management. All extensions can be installed in just one click. All extensions are automatically installed, making it easy for end-users to set up and create websites. Plesk’s interface is designed to only add the extensions that you need.


Leave a Reply