Are you considering purchasing a domain name and looking to create your DNS records on your Cloudflare account? This process may be daunting if you’re brand new to Cloud web hosting or aren’t familiar with DNS. It’s good to know that setting up DNS records is a simple process that can be accomplished with just a couple of steps. In this tutorial, we’ll explain how to set up DNS records for your domain in Cloudflare.
How to Add DNS Records in Cloudflare?
Before diving into the procedure, we must begin by understanding the basics of DNS and why it’s so important. DNS is shorthand for a Domain Name System, which is a method of converting human-readable domain names into IP addresses computers can recognize. In essence, DNS is like a phone book that is used on the internet. Without DNS, keeping track of the IP addresses for every site you’d like to go to is impossible, and that’s not practical.
To set DNS records for the domain in Cloudflare, you need an account. Once you have signed up with Cloudflare, you will gain access to the DNS management tools they offer. This means that you will be able to manage DNS records in Cloudflare for your domain names. How do you set up a DNS record for the domain within the account you have with your Cloudflare account?
Step 1: Log into your Cloudflare account
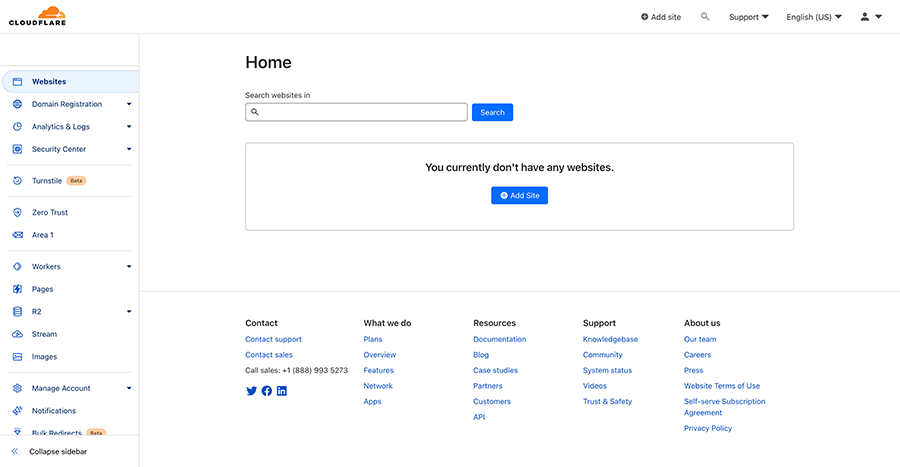
First, log in with your Cloudflare account. If you don’t have a Cloudflare account, you’ll need to sign up for one. After you’ve signed in, you’ll get taken to your Cloudflare account dashboard.
Step 2: Connect your domain name to Cloudflare
If you’ve not yet included your domain in Cloudflare, it’s time to do it right now. To add your domain, simply click the “Add a Site” button at the top left section of the dashboard. Input your domain name and follow the steps to verify the ownership of your domain.
Step 3: Select your domain
When you’ve joined your domain’s information to Cloudflare, you’ll have to choose it from the drop-down menu of domains in the dashboard.
Step 4: Open the DNS Management page
Then, select the “DNS” tab in the upper menu. It will bring you to the DNS administration page of your domain.
Step 5: How to add DNS records in Cloudflare
To create a brand newly created DNS record, simply click the “Add record” button. There are a variety of choices for the kind of record that you wish to add. These include AAAA, CNAME, MX, TXT, and SRV, the NS record. Let’s look over each one of these types of records:
A Record
An A record maps the domain name with the IPv4 address. It’s the most commonly used kind of DNS record, and it is utilized to connect your domain’s name to the IP address of your website server’s address. For adding an A record, type these details:
- Type: A
- Name: The name of the subdomain that you wish to connect at the IP address (e.g., www)
- IPv4 address: This is the IP address for your website server
AAAA record
An AAAA record is a record that maps a domain’s address with the IPv6 address. Similar to an A record, but it’s with IPv6 addresses. For the addition to an AAAA record, you must enter the following details:
- Type: AAAA
- Name: The name of the subdomain that you wish to connect at the IPv6 address (e.g., http)
- IPv6 address: The IPv6 address of your website server
CNAME record
A CNAME record is a mapping of one domain to an additional one. This can be utilized to link an unrelated subdomain to the primary domain or point an individual domain to a third-party service (e.g., an email provider, CDN, or an email service). In order to add a CNAME record, type in the following details:
- Type: CNAME
- Name: The subdomain to which you would like to connect to an additional domain (e.g., www)
- Value: The name of the domain you’d like to refer at
MX Record
An MX record is a mapping of a domain to an email server. This record is used to determine which email addresses will be sent to the domain. If you want to create an MX record for your domain, type the following data:
- Type: MX
- Name: The name of the subdomain that you’d like to use to send emails (e.g., mail)
- Valuation: Hostname for your server for email (e.g., mx.example.com)
- Priority: The level of priority for this server relative to the other mail servers. The lower numbers suggest a higher priority.
TXT Record
A TXT file is utilized to save textual data of any kind. It can be utilized for various purposes like domain verification as well as authenticating emails. To create a TXT record, simply enter the following data:
- Type: TXT
- Name: The name that is associated with this record (e.g., @ to refer to the domain that is root)
- Value: The text information that you would like to keep in the document
SRV Record
An SRV record can be used to indicate the location of a particular service. It is typically used to identify applications like SIP as well as XMPP. To add the SRV record, you must enter the following details:
- Type: SRV
- Name: The name given to the particular service (e.g.,”_sip”)
- Protocol: A protocol that is used to provide the service (e.g., for example, _tcp)
- Name: The name of the domain for the product (e.g., example.com)
- Value: The hostname and port of the service (e.g., sip.example.com:5060)
NS Record
An NS record is a record that identifies the name servers that are authoritative for the domain. This can be used to delegate the control of a subdomain to an alternative DNS service. In order to add to an NS record, type in the following data:
- Type: NS
- Name: The name of the subdomain that you would like to transfer (e.g., subdomain)
- Value: The hostname of the DNS provider you want to delegate to (e.g., ns1.otherdnsprovider.com)
Step 6: Save your changes
When you change nameservers in Cloudflare and add new DNS records, make sure you click “Save” to save your changes. Your DNS records must now be up-to-date, and your domain should point to the right address. address(es) as well as the email server(s).
Additional Tips and Considerations
- It’s recommended to make use of Cloudflare’s DNS administration tools regardless of whether you’re using another hosting service when you buy cloud server. Cloudflare’s DNS is more efficient and secure than other DNS providers. It also offers additional services, including DNSSEC and DDoS security.
- If you’re unsure of the kind of record to choose, ask your hosting company or the IT department.
- Remember that DNS modifications can be delayed for approximately 24 hours for them to be propagated across the internet. It could be a while before your DNS modifications take effect.
- Take care when making any changes to DNS records. Incorrect DNS records can make your website, or email not function properly.
- You should consider enabling DNSSEC on your domain to provide an additional layer of security for your DNS records.
Conclusion
The final step is to set the DNS record for the domain within the account of your Cloudflare account is an easy procedure to complete within a couple of steps. If you follow the instructions in this tutorial, you will be able to make sure that your domain’s DNS records are correctly directed to your website server or to your email servers.
Benefits of Using Cloudflare DNS Hosting
Cloudflare DNS hosting offers several advantages that can enhance your website’s performance and security. Key benefits include:
- Speed and Performance: Cloudflare’s global network ensures faster DNS resolution, reducing latency and improving load times.
- Security Enhancements: Built-in DDoS protection and SSL support help safeguard your site from malicious attacks.
- Reliability: With Cloudflare’s robust infrastructure, experience minimal downtime and consistent service availability.
Step-by-Step Guide to Setting Up Cloudflare DNS Hosting
Follow these steps to configure your domain’s DNS settings in Cloudflare:
- Create a Cloudflare Account: Sign up on Cloudflare’s website and add your domain.
- Update DNS Records: Access the DNS tab in your Cloudflare dashboard to add or modify records as needed.
- Change Name Servers: Replace your current name servers with those provided by Cloudflare to complete the setup.
Cloudflare DNS vs Traditional DNS Hosting
| Feature | Cloudflare DNS | Traditional DNS |
|---|---|---|
| Speed | Fast, global network | Varies by provider |
| Security | Built-in DDoS and SSL | Basic security features |
| Reliability | High uptime | Dependent on provider |
FAQ
What is Cloudflare DNS hosting?
Cloudflare DNS hosting is a service that provides fast and secure DNS resolution through Cloudflare’s global network, enhancing website performance and security.
How do I migrate my DNS to Cloudflare?
To migrate your DNS to Cloudflare, sign up for an account, add your domain, update DNS records, and change your domain’s name servers to those provided by Cloudflare.
Is Cloudflare DNS hosting free?
Cloudflare offers a free DNS hosting plan with basic features. For advanced functionalities, you can opt for their premium plans.
For more comprehensive hosting solutions, explore our web hosting services that integrate seamlessly with Cloudflare for optimal performance.
Understanding Cloudflare DNS Hosting: Key Features
Cloudflare DNS hosting offers a range of features that enhance the performance and security of your website. One of the standout features is its global content delivery network (CDN), which caches your website content across Cloudflare’s extensive network of data centers worldwide. This ensures that users access your site from the nearest server, reducing latency and improving load times.
Another crucial feature is Cloudflare’s DDoS protection. By automatically detecting and mitigating distributed denial-of-service attacks, Cloudflare ensures your website remains accessible even during high-traffic events. Additionally, Cloudflare provides DNSSEC (Domain Name System Security Extensions) support, which adds an extra layer of security by protecting your DNS records from tampering and ensuring data integrity.
Comparing Cloudflare DNS with Traditional DNS Providers
When comparing Cloudflare DNS to traditional DNS providers, speed and security are the primary differentiators. Traditional DNS providers often rely on fewer, centralized servers, which can lead to slower response times compared to Cloudflare’s globally distributed network. This global presence means that Cloudflare can deliver faster DNS resolution, improving overall website performance.
Security is another area where Cloudflare outshines many traditional providers. While most DNS services offer basic security features, Cloudflare’s advanced security protocols, including automatic SSL/TLS encryption and DDoS protection, provide robust defense mechanisms that are typically not available with conventional DNS providers. This makes Cloudflare a preferred choice for businesses looking to enhance both speed and security.
Best Practices for Configuring Cloudflare DNS
To maximize the benefits of Cloudflare DNS hosting, it’s essential to follow best practices during configuration. Start by ensuring that your DNS records are correctly set up. This includes A records for your domain and subdomains, MX records for email services, and CNAME records where appropriate. Double-check these entries to avoid common errors that could disrupt your website’s accessibility.
- Regularly update your DNS records to reflect any changes in your server or email configurations.
- Enable DNSSEC to protect your domain from DNS spoofing and ensure data integrity.
- Utilize Cloudflare’s analytics to monitor traffic and identify potential security threats.
These practices not only enhance security but also ensure optimal performance of your website through Cloudflare’s DNS hosting.
Troubleshooting Common Cloudflare DNS Issues
Despite its robust features, users may occasionally encounter issues with Cloudflare DNS hosting. One common problem is DNS propagation delay, where changes to DNS records take time to update globally. To mitigate this, ensure that your TTL (Time to Live) settings are appropriately configured to minimize delays.
Another issue could be incorrect DNS settings leading to website downtime. Verify that all DNS records are correctly entered and reflect the current server configurations. If you experience persistent issues, use Cloudflare’s diagnostic tools to identify and resolve conflicts or errors in your DNS setup.
By understanding these common issues and their solutions, you can maintain seamless website operation and leverage Cloudflare DNS hosting’s full potential.
Leave a Reply