
cPanel is the most popular web hosting control platform that every single hosting provider on the internet uses. By using cPanel, you can manage the backend for your website. You might come across a few questions while using it. In this article, we will go over every single question you have or may have, from what is cPanel to a simple and straightforward cPanel guide that you can use while dealing with cPanel for VPS or WordPress.
What Is cPanel?
cPanel allows you to perform a range of tasks on your website. It is typically provided by web hosts, and typically, when you buy cPanel VPS hosting, it is installed automatically at the back end. These tools include setting up WordPress, creating subdomains and installing SSL certificates.
cPanel is a well-known tool in the WordPress community for its simplicity and compatibility when it comes down to VPS hosting with cPanel. Nowadays, every single hosting company has some sort of plan that is designed to work with the best control panel for VPS. So, how can you use cPanel? As mentioned above, in this cPanel complete guide, we will teach you how to use your VPS hosting with cPanel.
cPanel’s File Manager
The File Manager provides basic file management tools for your cPanel. It can be used to upload and extract files as well as create files and folders and assign permissions. It shares the functionality of an FTP client but is not as powerful.
Where Is File Manager in cPanel
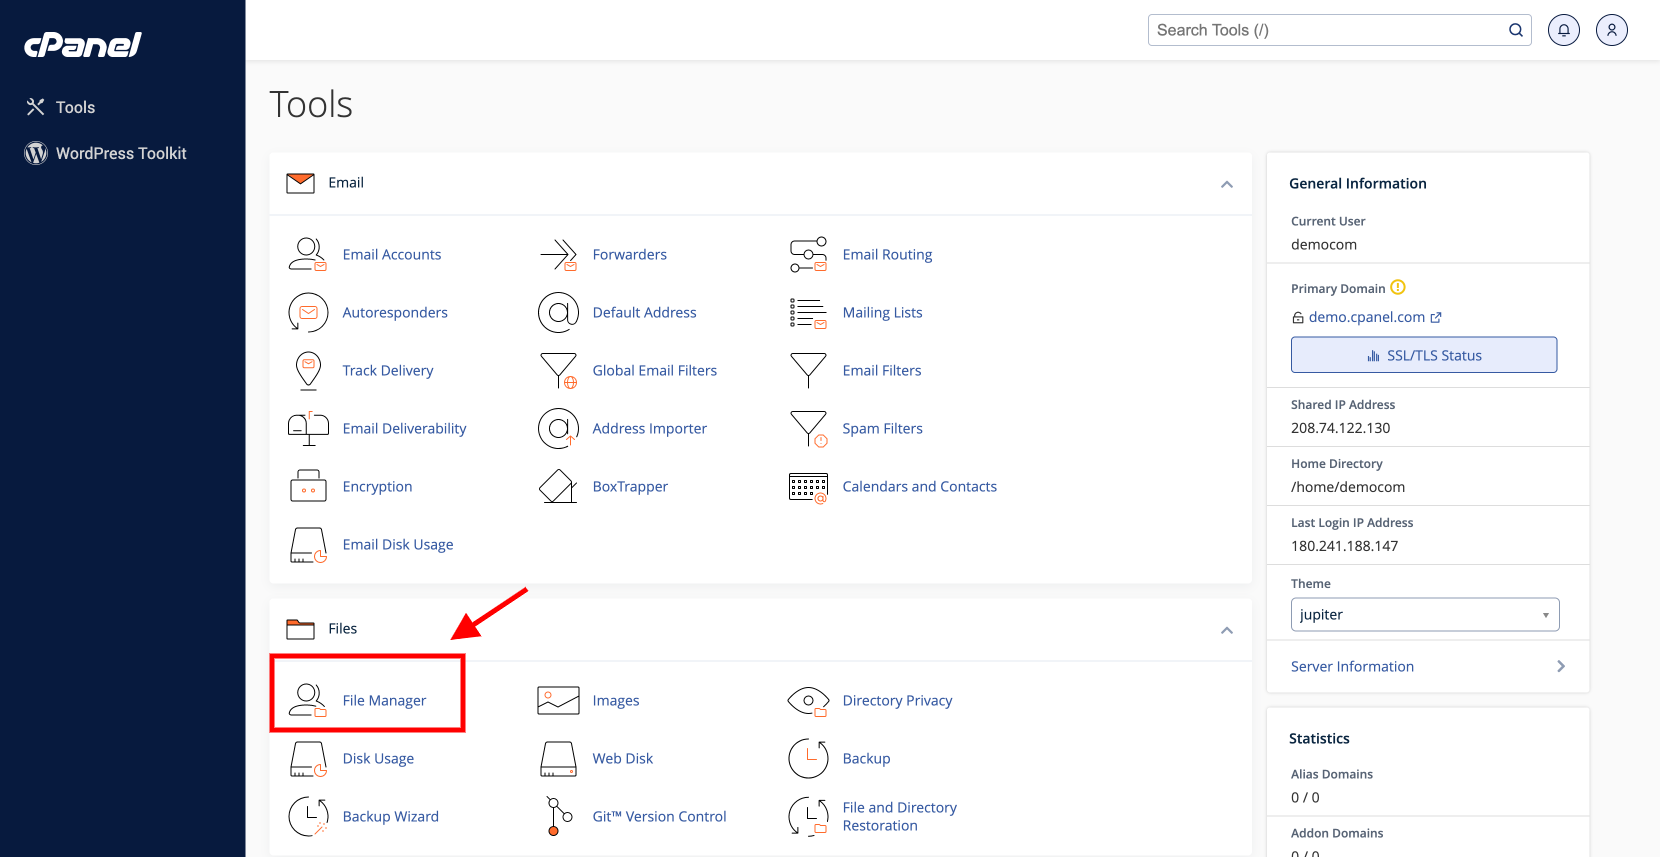
- After logging into your cPanel, you will find the file manager.
- You’ll see a new window when you open the tool. This will show you navigation and management options, as well as a directory listing all files and folders that your website has.
Using File Manager

First, a window section shows you the folder tree and the contents of the folder. Click on the folder you want to navigate to. Clicking on the Public_html folder, for example, will display its contents – .well known, cgi bin, robots.txt, etc. This is where your website gets stored.
You can also navigate to a folder by entering its full name path and then clicking Go in the folder tree search function.
There are many navigation functions:
- Home: Click it to display the Home folder with its contents
- Up One Level: moves up one level from the current location. This will bring you back to the public_html folder. It is higher than the cgi bin folder.
- Back/Forward: Works pretty much the exact same way as in your web browser’s back/forward navigation
- Reload: refresh the page to see changes
- Select/Unselect: To select files or folders or to deselect them
- View Trash: displays the trash directory where all files have been deleted
- Empty trash: To clear the trash directory. This feature can only be used in the trash folder
File Manager Features
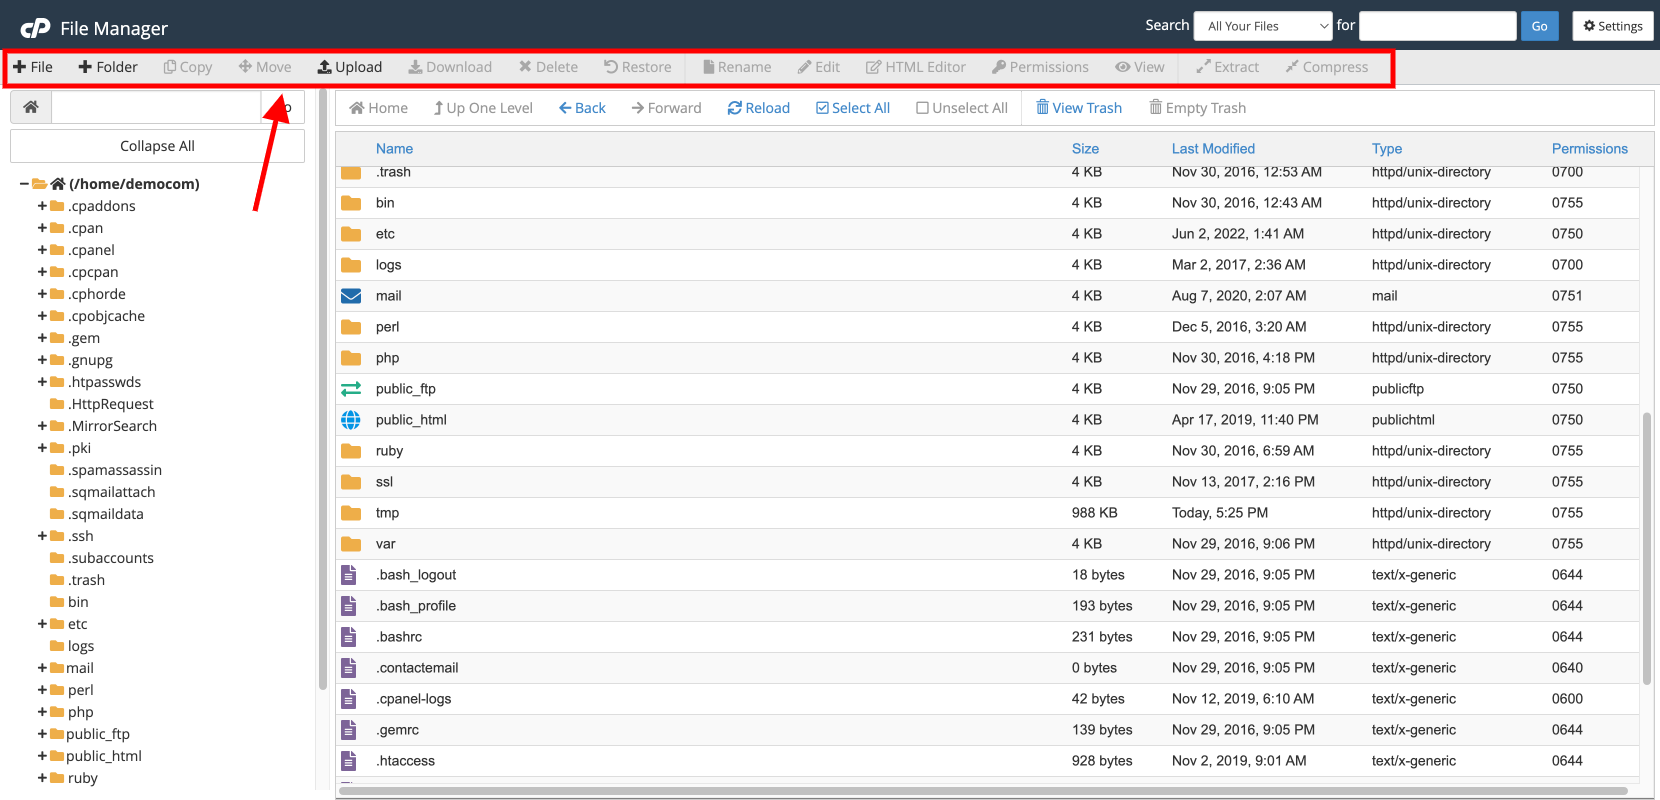
Next, you need to learn about file management. You can access the majority of the features via right-clicking on an item. There is also a toolbar that you can use to assist you.
- File: This feature allows you to create a new folder within a specific folder. This will create an index.php file within the public_html directory.
- Folder: This feature allows you to create a new folder.
- Copy: You can copy the selected file into a particular destination.
- Move: This function works exactly the same as Copy. The only difference is that the file will not be moved to its original location.
- Upload: You can upload a file directly to your hosting account. You can’t upload folders. FTP clients can be used to upload large files or folders. There are two ways to upload the file: either drag and drop or manually select it from your computer. After you are done, click on the Return to link.
- Download: This function will download selected files to your computer.
- Delete: This option moves the selected file into the Trash folder. You can permanently delete the file by checking the Skip the trash box.
- Restore: This feature is only available if you are in the trash folder. Restore a deleted file to its original folder origin.
- Edit/HTML Editor: These features are required to edit your files. These features work in a similar way to any text editor software and can be very useful for editing while on the move. Although it has a WYSIWYG interface, it is not as powerful as other HTML editor’s software.
- Permissions: This feature allows you to give permission to a particular file or folder. It is important to understand everything you are doing before you change it. This can lead to problems for your website.
- View: This allows you to view files, such as a picture or index.php content.
- Extract/Compress: With compress, you can save selected content to a Zip or Gzip format. The extract can do the reverse – extract an archive.
- Preferences: With this feature, you can customize your preferences. You can, for example, set the default folder that you want to open when you use Folder Manager. You can also choose Show Hidden files (dotfiles). To block certain elements of your website, you can edit .htaccess.
This is all you need to know regarding the navigation and management functions on the file manager. Next, in this cPanel tutorial, we will discuss bandwidth usage, which is an important aspect of your hosting plan.
Checking Bandwidth in cPanel
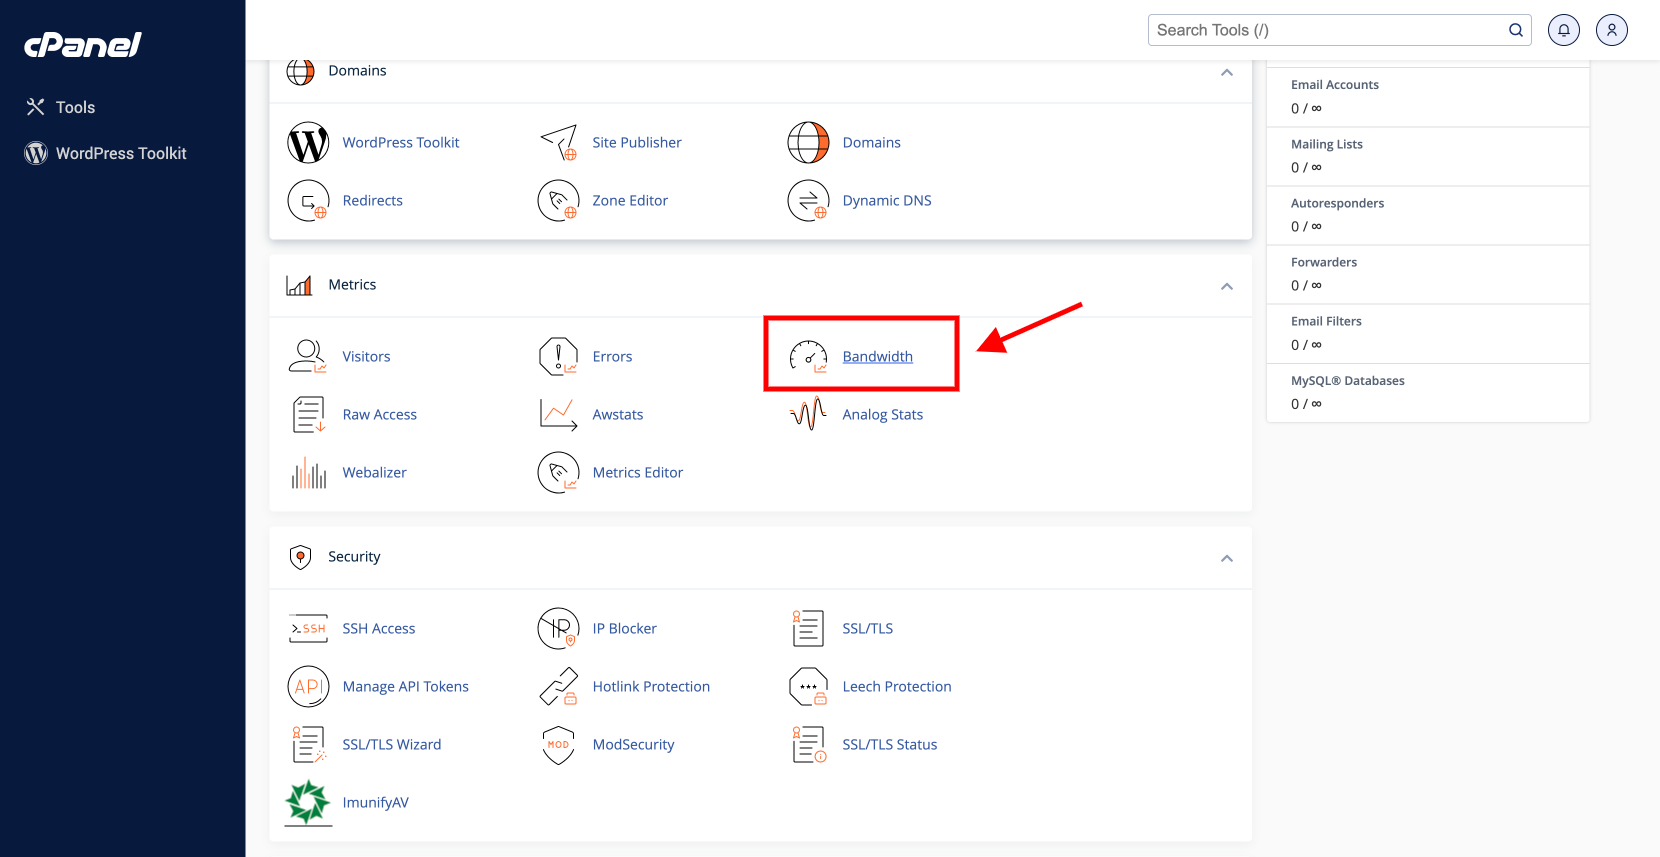
Bandwidth refers to all traffic and data that is transferred from your hosting account. The usage is dependent on many factors, including the number of visitors and FTP connection.
It is important to examine bandwidth usage as it often relates to the hosting plan you have subscribed to. cPanel will notify you by email when your limit is approaching. This is a crucial feature for cPanel VPS users. How do you check bandwidth in cPanel?
Summary on the homepage
Logging in will immediately show you the bandwidth usage summary in the right-hand panel, under the statistics section.
Bandwidth Statistics
The Bandwidth link in the previous step will take you to the complete statistics. You can also search bandwidth using the search feature.
Clicking on one of these options will open a new window that displays your consumption based on a daily, weekly and monthly basis. It also shows you the total sum.
As you can see, cPanel monitors traffic from these sources:
- HTTP traffic: This is the data that was sent and received via the protocol
- FTP traffic: Tracks the transfer protocol you use to access or share files between your computer and the server
- IMAP/POP3/SMTP traffic: This is the email communication between your server/mail client.
This is all there is to know about bandwidth usage. It is very useful to know what’s causing your bandwidth usage to exceed the limit. Then you can take corrective action. Keep in mind that many hosting companies tend to advertise unlimited bandwidth, which is not true. There is always a limit to it.
cPanel Disk Space Usage
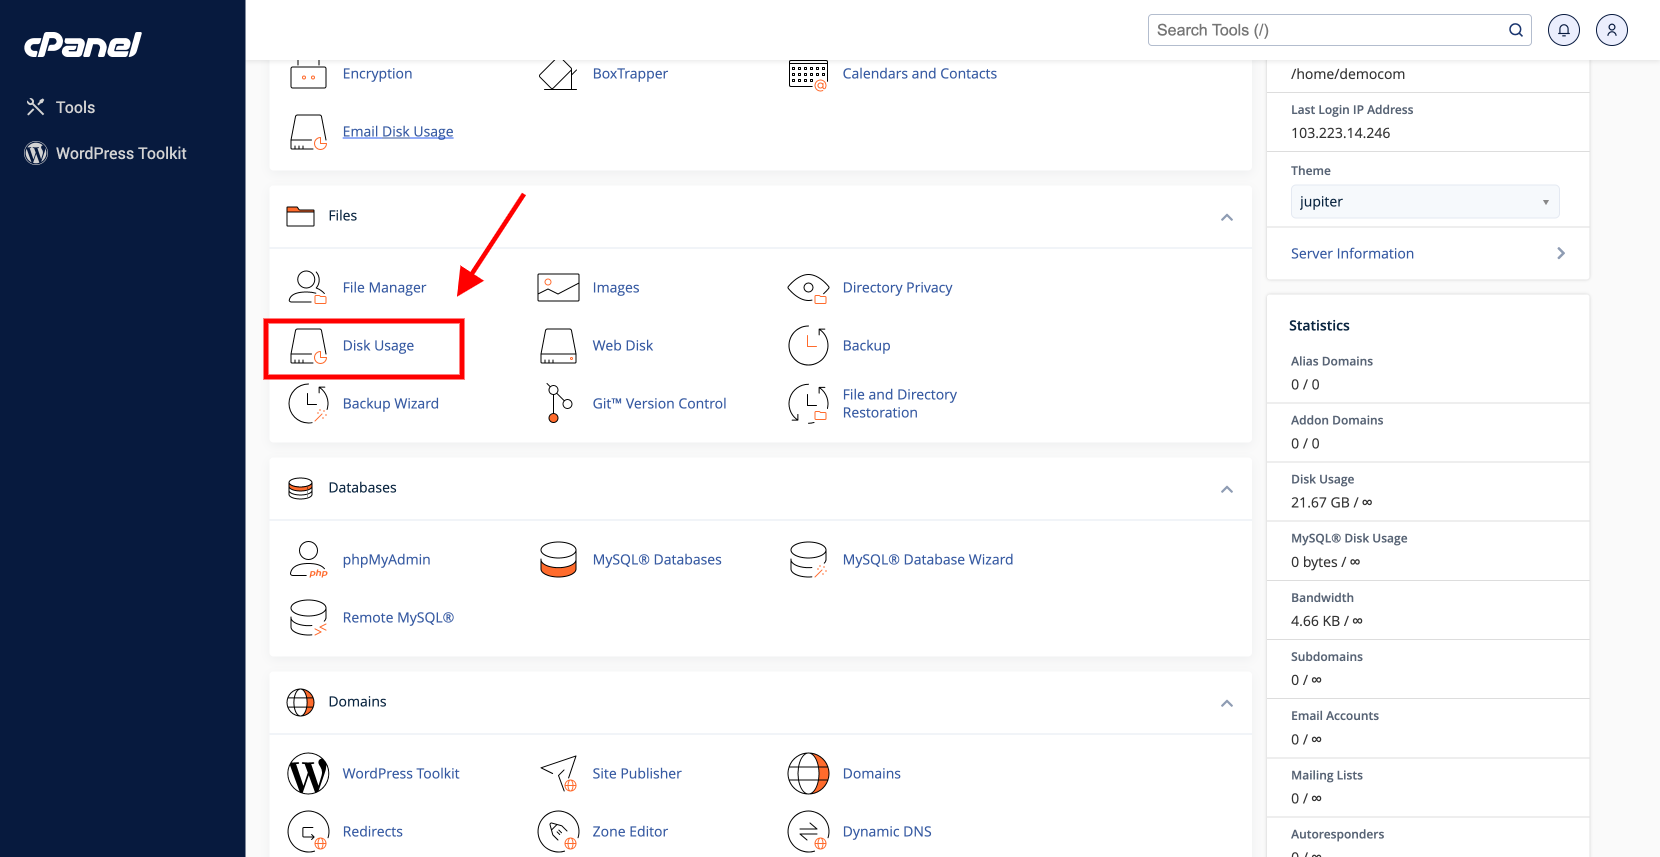
The total amount of data stored in your account, including files from websites and MySQL databases, is called your disk space usage.
cPanel will send warnings about disk space to your email address when you reach 80%, 90% or 98% disk usage. In cPanel, you can change your contact email address under Preferences.
Summary
Log in to your cPanel. On the right side, you’ll see a summary of your Disk Storage.
Disk Space Usage Statistics
You can view full details about your Disk Space Usage by clicking on the Block Usage button in the Files section.
Scroll down and expand the folders by clicking on the sign left of each folder. This will display exactly how much disk space you have used.
Click on the folder you wish to delete, and File Manager will open in your browser.
Next, in this cPanel tutorial, let’s make your cPanel accounts more secure by enabling two-factor authentication in cPanel.
Setting up Two-Factor for cPanel
Two-factor authentication (2FA), which can be added to your cPanel account, is a good idea as it protects the data.
It’s one of the best ways to increase your account security. The software can be used to create a time-based, one-time password (TOTP). This will give you an individual code that you must input before you can access your account.
Regards to the cPanel documentations:” To use this feature, your hosting provider must enable 2FA in WHM’s Two-Factor Authentication interface (WHM >> Home >> Security Center >> Two-Factor Authentication).”
Enable Two-Factor
- After logging in to your cPanel, you can open the Two Factor Authentication tool. Click the Set up Two-Factor authentication button.
- Open your authentication app. You can scan the QR code from there or manually enter the key.
- After scanning, enter the six-digit token found on your authentication App. Next, click Configure 2-Factor Authentication.
Log Back to cPanel
After clicking Return, you will be redirected to the login screen. The six-digit token that you found on your authentication application will be required. This is what you will need each time you log in.
You have now created an additional layer of security that makes your cPanel for VPS even safer than it was.
The next part of our cPanel tutorial will show you how to add a domain in cPanel.
cPanel’s Add-on Domain
Additional domains can be stored under your main domain as add-on domains. You can create multiple domains and manage them all from one account with cPanel. This is possible using the addon Domains tool. Let’s get started.
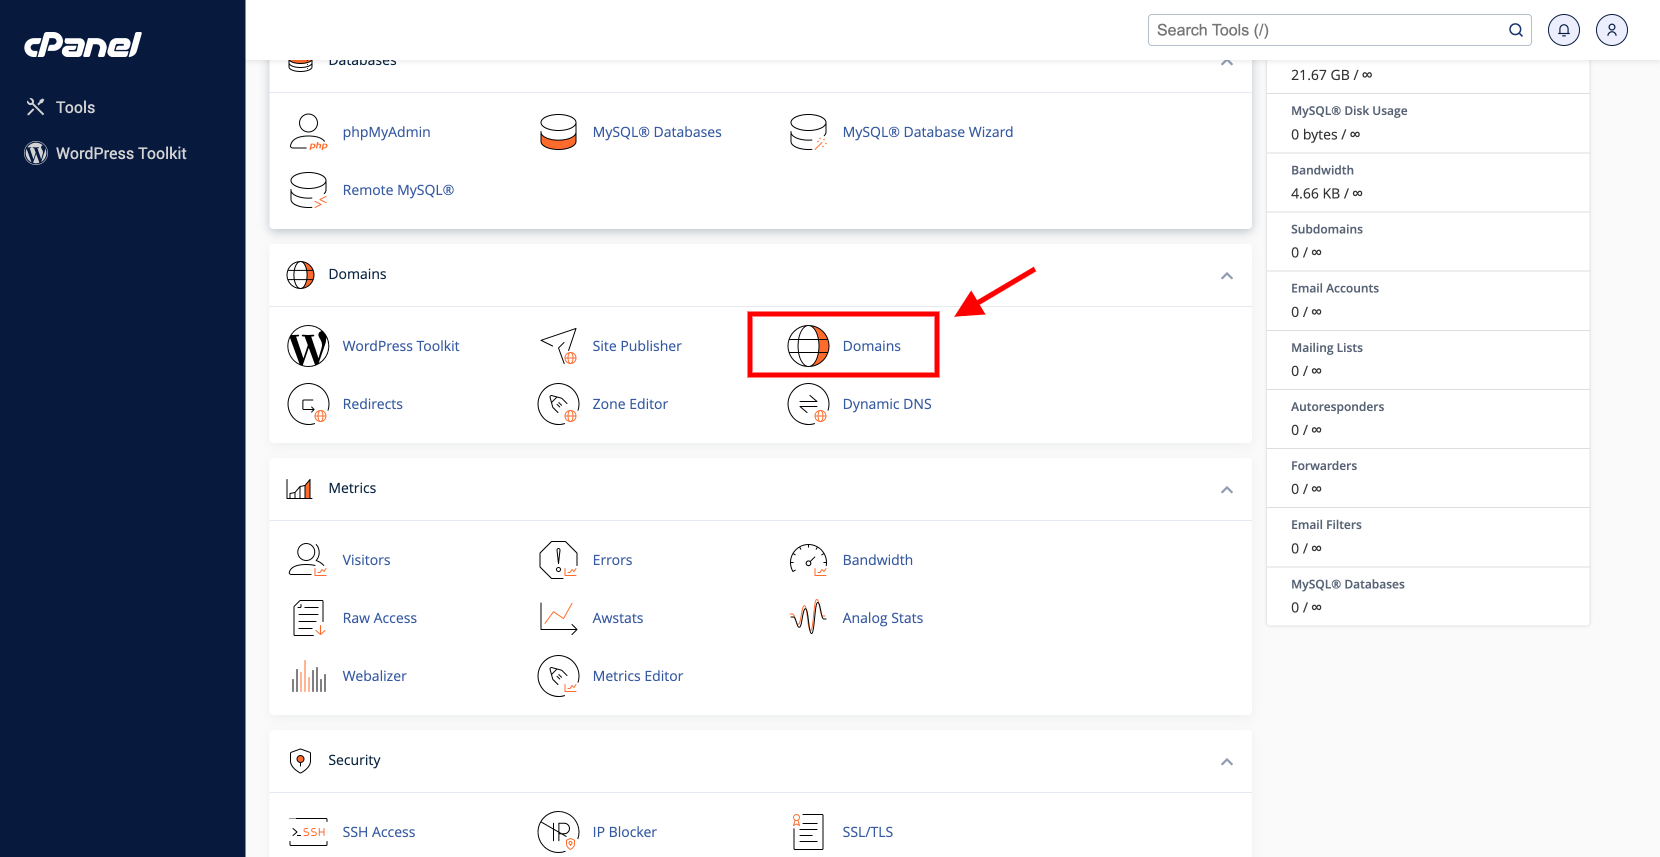
Access Domains Tool
Search and open Addon domains from your main dashboard.
Create an Add-on Domain
After you have opened the tool, fill in the form. Below is a description of each field.
- Name: You simply need to enter your domain name
- Subdomain: cPanel will add the subdomain name. You can add only one domain name. If you plan to add more domain names with the same name and different TLDs (e.g., samedomainname.com or samedomainname.net), you will need to modify it
- Document root: this will also fill automatically. This is the path to your addon domain’s contents
- Create an FTP account: This option allows you to create another FTP account to manage the addon domain. You don’t have to create an FTP account if you are going to manage the domain. You can, however, set up an addon domain for another person by checking the Create FTP account. They will have limited access to the addon domain files if they have a separate account.
After you have completed that, click on the Add domain button.
Once the addon domain has been successfully created, you can upload the website’s file into the subfolder created by the File Manager from your cPanel Account.
Manage Added Add-on Domains
After the domain is added, it should be visible in the Modify Addon Domain List. This is the description of that section.
- Addon domains: You can see all domains that you have added here
- Document root: path to the specific domain. Click the link to be taken to the file manager
- Subdomain: An automatic name that is created using the form
- Redirects: You can redirect the domain to another location; it shares the same feature as Aliases. It will say not redirect since we aren’t doing that. If you do want to change the redirection path, click the Manage redirection button.
- Actions: An option to remove an addon domain from this list
You now know how to manage addon domains using your cPanel accounts. The same account can be used to upload files or do backend administration for another domain.
How to Create a Subdomain in cPanel
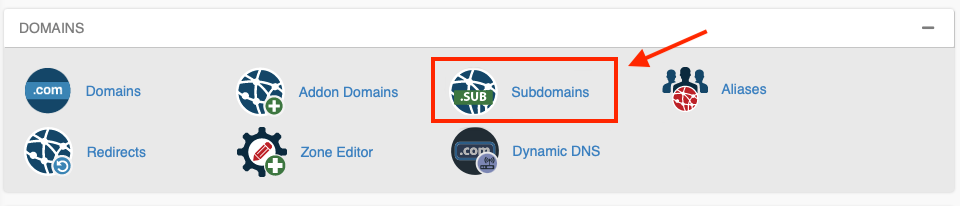
Subdomains can be extended domains. Subdomains can be used to host other websites and function independently from the main domain. This feature can be very handy for VPS hosting with cPanel since you’ll be able to use your cPanel for VPS and have more than one website. The format of a subdomain is subdomain.domain.com.
Let’s suppose we have a domain on mywebsite.com. We want to create a forum for our main site and a blog. They can be found at forum.mywebsite.com or blog.mywebsite.com. These subdomains are also accessible via mywebsite.com/forum or mywebsite.com/blog.
Access the subdomains section of cPanel to create a subdomain.
- A subdomain is the name of a subdomain. Only The subdomain extension must be entered in this section.
- The domain allows you to choose the domain where the subdomain will appear.
- The document root is the root folder of a subdomain. This folder is automatically created in public_html.
For assistance, contact the hosting provider if you encounter any errors or problems during this step.
How to Upload Files to Subdomain root
All files/scripts must be uploaded to the Doc Root directory as described above. This directory is automatically created by public_html. It can be accessed easily using the File manager section in cPanel. If a subdomain is created using an Addon Domain, the subdomain’s Document Root will be created inside the root directory of the addon domain, for example, public_html/addon_domain_root/subdomain_root.
How to Delete a Subdomain in cPanel
It is possible to delete a subdomain if it is not needed or if the name is incorrectly entered. You can delete a subdomain by clicking the Remove button under cPanel->Subdomains.
If you want to create a subdomain that has a different name but displays the same content, it is best to delete the subdomain and create a new subdomain with the same root directory as the one deleted.
Subdomains can be used to quickly and cheaply create additional websites. You can also use them to create specific areas on your main website, such as a forum or blog.
- Subdomains can be used to create domain extensions that are independently functional.
- You can modify the subdomain DNS configuration without affecting your main domain.
How to park a domain in cPanel
A different domain type is a great way to “protect” your brand. You will likely buy multiple domain names if you want your brand online.
You can buy popular TLDs such as.org or.net to launch your brand, and you can also purchase specific country codes (.us for US webmasters, or.jp in Japan)
Visitors will be directed to yourdomain.org instead of your primary domain yourdomain.com. This can be done using the domain parking option. To do this, cPanel offers a tool called aliases.
You will need these things:
- Access to your cPanel Account
- Multiple domain names
Go to Aliases
Open the Aliases Tool under the domains section from your cPanel dashboard.
Create a New Parked Domain
Click Add Domain and enter the domain name that you wish to add under the New Alias Section.
A valid domain registrar must be used to add domains. You will get an error message if you don’t. Nameserver information will also be provided, along with instructions for pointing out the DNS server from your registrar.
Manage Park Domain Redirection
After you have added the domain, it will be listed in the Aliases List. Click Manage Redirection.
Manage Park Domain Alias Redirection
Enter the primary domain that you wish the alias URL to point to in the form, and then click Save.
After you have successfully added the redirection, it can take up to 24 hours to take effect due to DNS propagation globally.
cPanel’s DNS Zone Editor
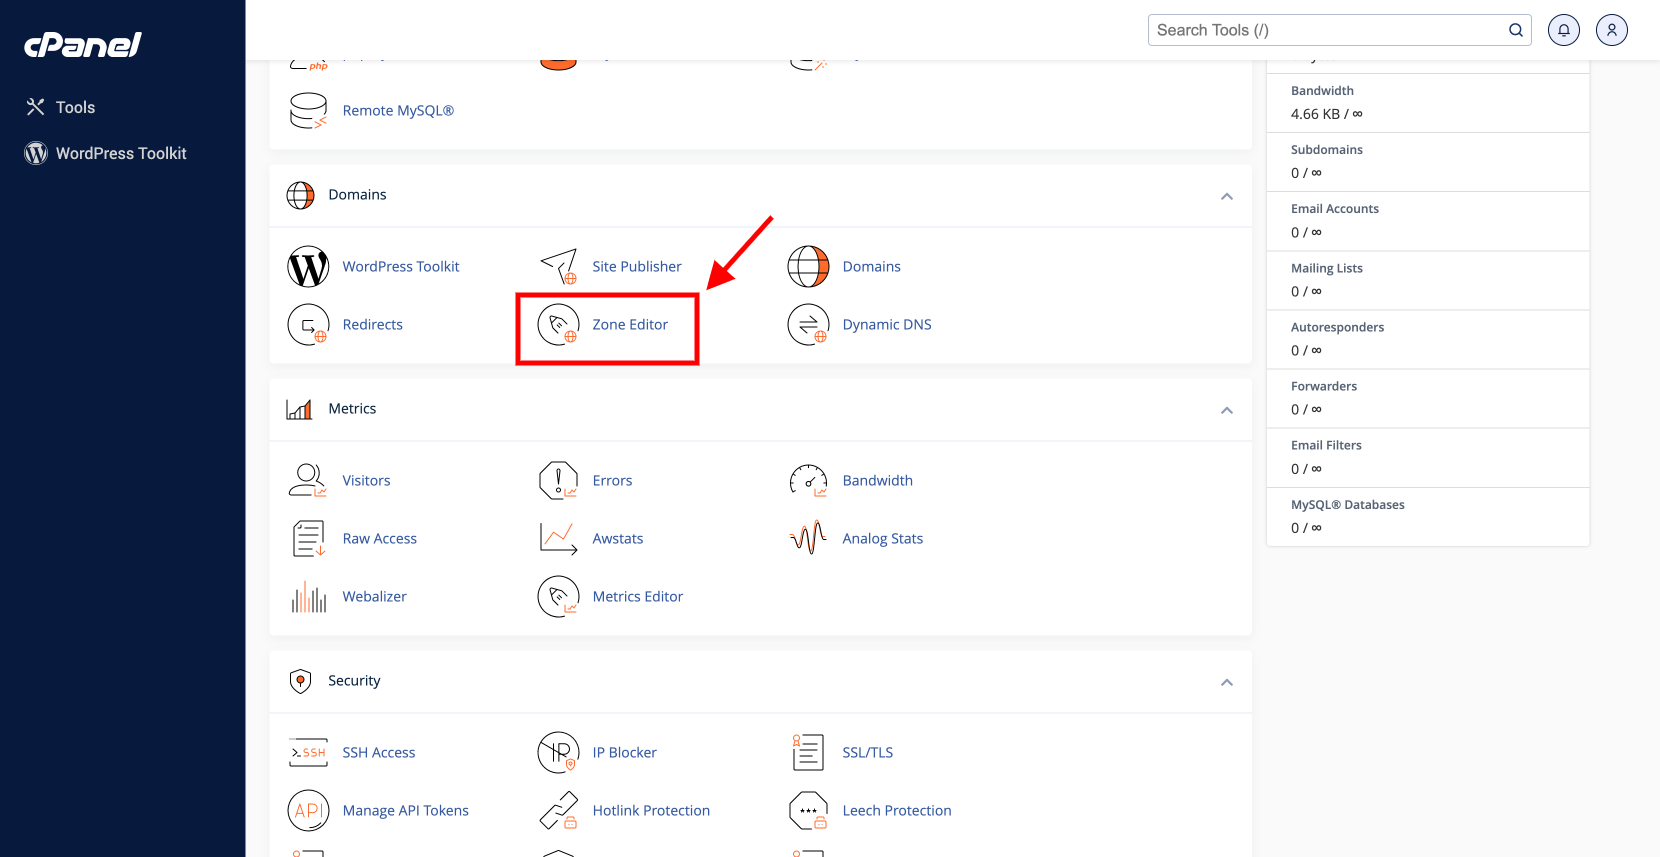
Two types of zone editors are offered by cPanel: Simple DNS Zone Editor and Advanced DNS Zone Editor. Let’s start with the first.
DNS Zone Editor
You can perform four actions with the simple interface once you have opened the tool.
A Record
You can add an A record to your domain name. This can be used to map an IP address for a domain from a hosting provider. You can also use this to redundancy domains by adding multiple A Records to the same domain.
Simply click the button to add one. Fill in all required fields. The name allows you to enter the hostname of the record. The address allows you to enter the IPv4 address you wish to point to. After you are done, click Add a Record.
CNAME Record
A Canonical Name (or simply CNAME) can be used for mapping an alias to a real domain name. This can be used to map a subdomain to the main domain, such as www or mail. You can also look at your CNAME Records if you use Google Suite.
Click CNA Record. Enter the hostname of the record in the Name. In CNAME, enter the subdomain name you wish to map.
MX Record
Mail servers will use the Mail Exchange Record (MX) to determine where the email is being delivered. Because they often work together, you should give the same value to MX Records as to A Records.
Click the MX Record button to add one. The Priority value is preferred. The destination can be used the same as A Record.
Manage
You can access the Advanced Domain Zone Editor by clicking on it in the panel. You will also find a list listing all DNS records for your domain.
Advanced DNS Zone Editor
The advanced editor allows you to edit and customize a TTL value. This is especially useful if you need to edit a record that has been inactive. You can edit the settings above and create additional types of records, including:
- AAAA Record: Maps a domain name to IPv6 address
- Certification Authority Authorization Record: Permits a specific authority to issue certificates for domains
- Domain-based message authentication, reporting and conformance (DMARC), Record: Improves security against suspicious emails or fraudulent attempts.
- SRV: Maps one domain to the other, just like we did in our previous tutorial
- TXT Records: Can hold any type of text information. It is commonly used to store DMARC content.
You now know how to use the zone editor. Now you can add, edit or delete any records in your domain.
Adding SRV Record in cPanel
SRV records can be used to identify the exact location of services at different places. This is often used to connect websites or services that are hosted independently. This is used by many services, including IMAP/POP3/SMTP and Minecraft servers.
SRV Record Details
You will need to enter several details in your SRV record depending on the service and protocol you use.
- Name: The domain name that is used by the service. It should end with a dot, e.g., _worldofwarcraft._tcp.yourdomain.com. (Note: Only use underscores before service and protocol)
- TTL: Limits the record’s lifetime. The default value for this field is 14400
- Priority: This determines which records should be prioritized. A lower value is better
- Weight: Determines which records should be prioritized. Preferable means that the value is higher
- Port: The port number used by this service
- Target: The destination hostname to which the SRV records will point, e.g., warcraft.server.com
Locate DNS Zone Editor in cPanel
Log in to find the DNS Zone Tool. It can be found under the domains section.
Add an SRV
- Select the domain to which you wish to add the SRV records, then click Manage. Click the dropdown right beside the filter search box, and select Add SRV Record.
- Below, a new form will open. Fill in all required information. After you are done, click Add Record.
After you are done, the newly created records should be added to the zone Record list. The SRV Record usually takes less than 15 minutes to take effect. However, it can take up to 24 hours sometimes.
If your SRV Record does not start within 24hrs, please contact your hosting provider to verify that all details are correct and that the port number hasn’t been blocked.
How to Create MySQL Database in cPanel
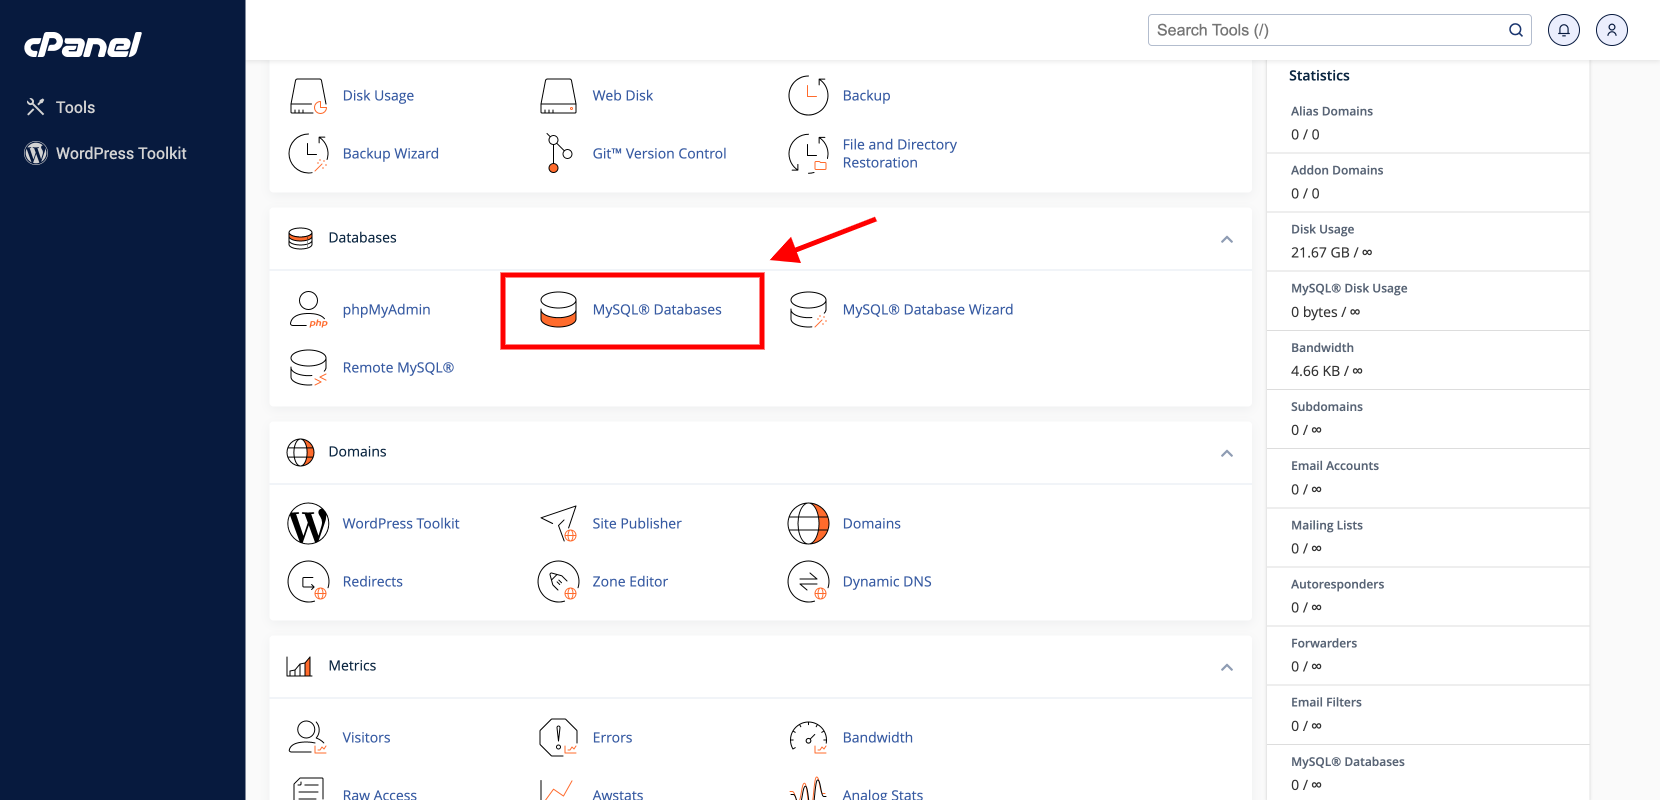
Each website requires a place to store data. Think of it as a home for your website or data.
Find MySQL Databases
Log in to access the MySQL Databases Tool.
Create a new database
The MySQL Databases window will open. Enter the database name without spaces in the appropriate field, then click Create Database. Once done, click Go Back.
Create and add new user
Scroll down to find the Add User form. Fill it in without any spaces. Repeat the process by entering your password.
To create a stronger password combination, you can also use a Password generator. Click Copy this password to a safe place, and then click Enter Password.
Once done, click Create User.
After clicking Go back, fill out the form To Database. Choose the user you wish to assign from the drop-down menu.
After clicking Add, you will be taken to the Manage user privileges window.
Give created user privileges
This step allows you to grant privileges to users. You can create an admin by checking ALL Privileges and then clicking the Make changes button.
You have now created a user, a database and the privileges required to access the website’s databases.
Using MySQL Remote Feature
Remote MySQL access is beneficial for many reasons. Remote hosts (other servers) can access your MySQL databases. You can allow third parties to access the database, like a shopping cart app.
You will need these things:
- Access to your cPanel Account
- The IP address or domain you wish to grant access to
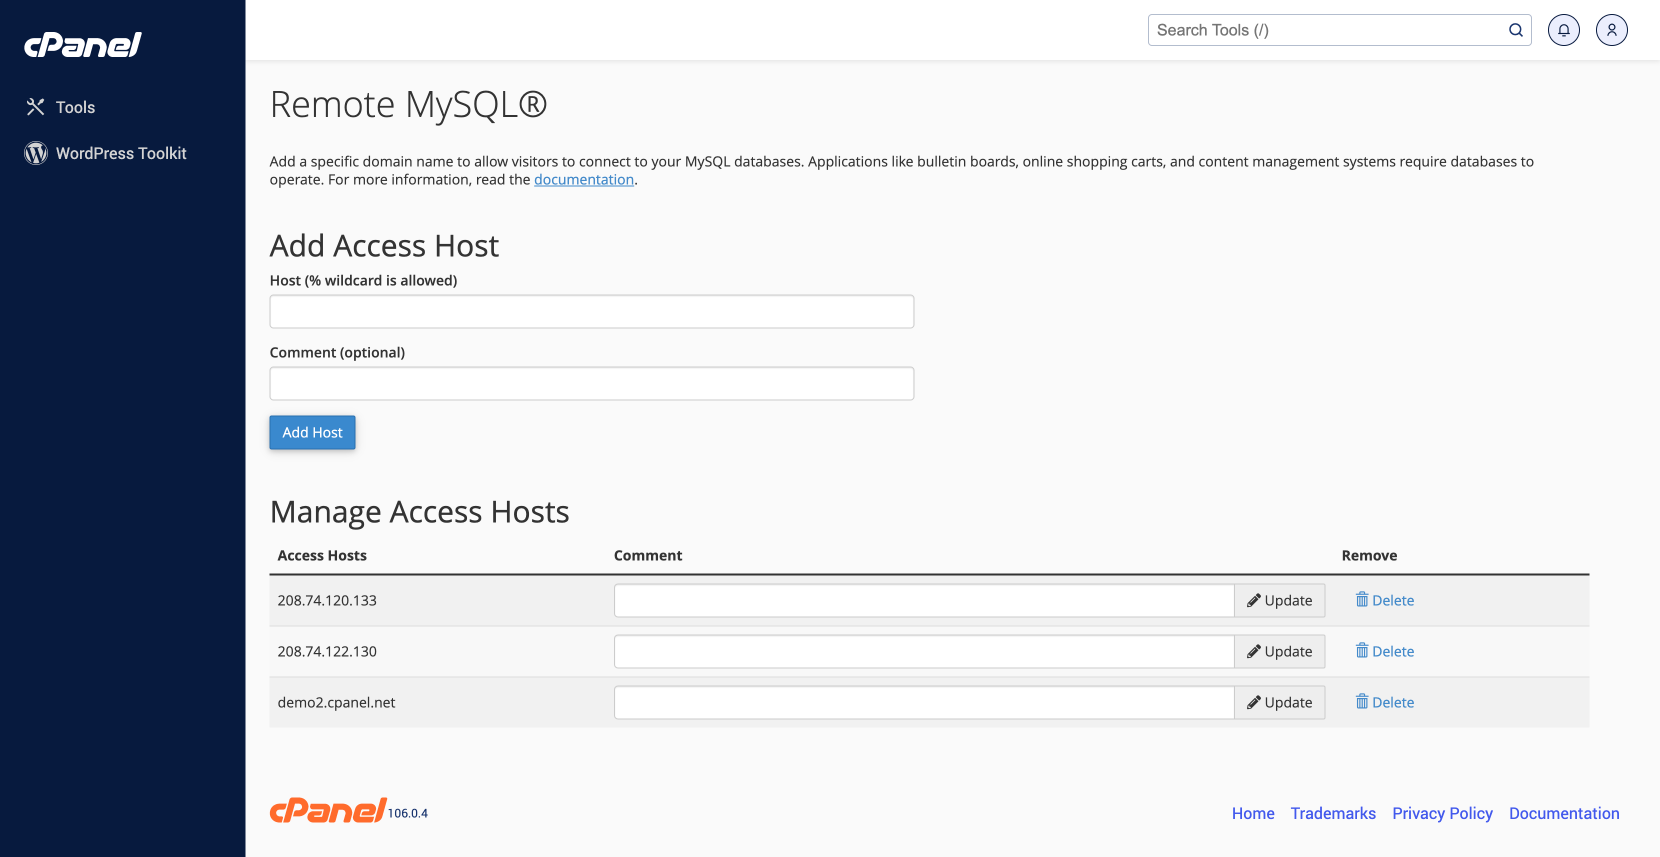
Find Remote MySQL in cPanel
Locate and open Remote MySQL under the Databases section.
Allow Remote Server Access
In the Host box, enter the hostname and IP address. You can access the database via the localhost by using your public IP address, which can be found here. You can also enter a domain name that is fully qualified, such as www.google.com and click Add host.
Removing Remote Server Access
You can remove access previously granted to you by following these steps:
- Locate the hostname that you want to delete in the Manage Access Hosts List, then click Delete.
- You will see a confirmation window. Click Remove Access host.
That’s all. Remote access to MySQL databases can be easily granted and denied. Please do not give permission to anyone unauthorized for security reasons.
How to set up an email account in cPanel
It is easy to create an email account with cPanel.
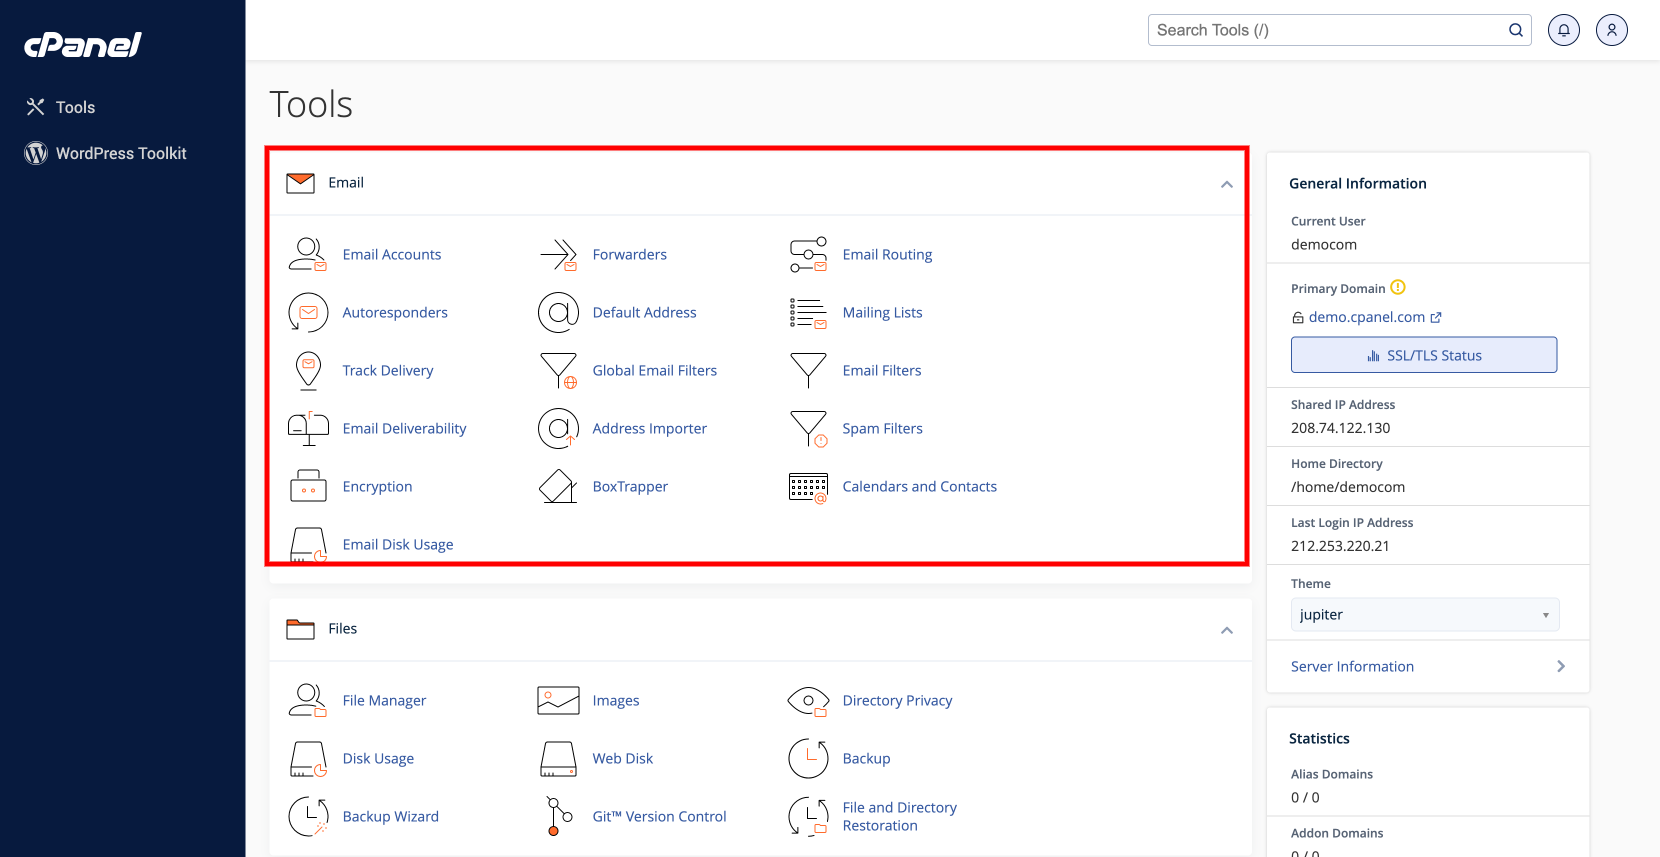
Find the Email section in cPanel
Navigate to the section of your cPanel dashboard. Or, you can search for the accounting tool.
Creating a new email
- After it has opened, click on the Create link to open a new window.
- Each field must be filled in.
- Username: This is the username that you wish to use for your email. If you want to use info@yourdomain.com, then enter information in this field.
- Security: You will need to enter a password for your email account. It is strongly recommended to use a combination of numbers and uppercase letters for a strong password.
- Provide an alternative email: If you need to reset your email password with another account, you can send the alternative email here
- Storage Space: You have two options: unlimited or limited. You won’t receive any emails if your email storage exceeds the limit. You shouldn’t worry if unlimited storage is chosen.
After everything is in place, click on the Create link.
You will receive an email configuration detail for setting up an email client if you have checked the Send welcome email with instructions to set up a mail client. It can be used to create your webmail using a client like Mail, Microsoft Outlook or Mozilla Thunderbird.
That’s all. Now you can use the email address to communicate with your audience. The Site Publisher is the next in this cPanel tutorial. It’s a very popular tool that allows you to create a temporary website.
Using cPanel’s Site Publisher to create a website
The Website Publisher is an excellent tool that allows you to create simple websites quickly, even if it’s your first time. You can choose from a variety of templates and then add the information you need to each one.
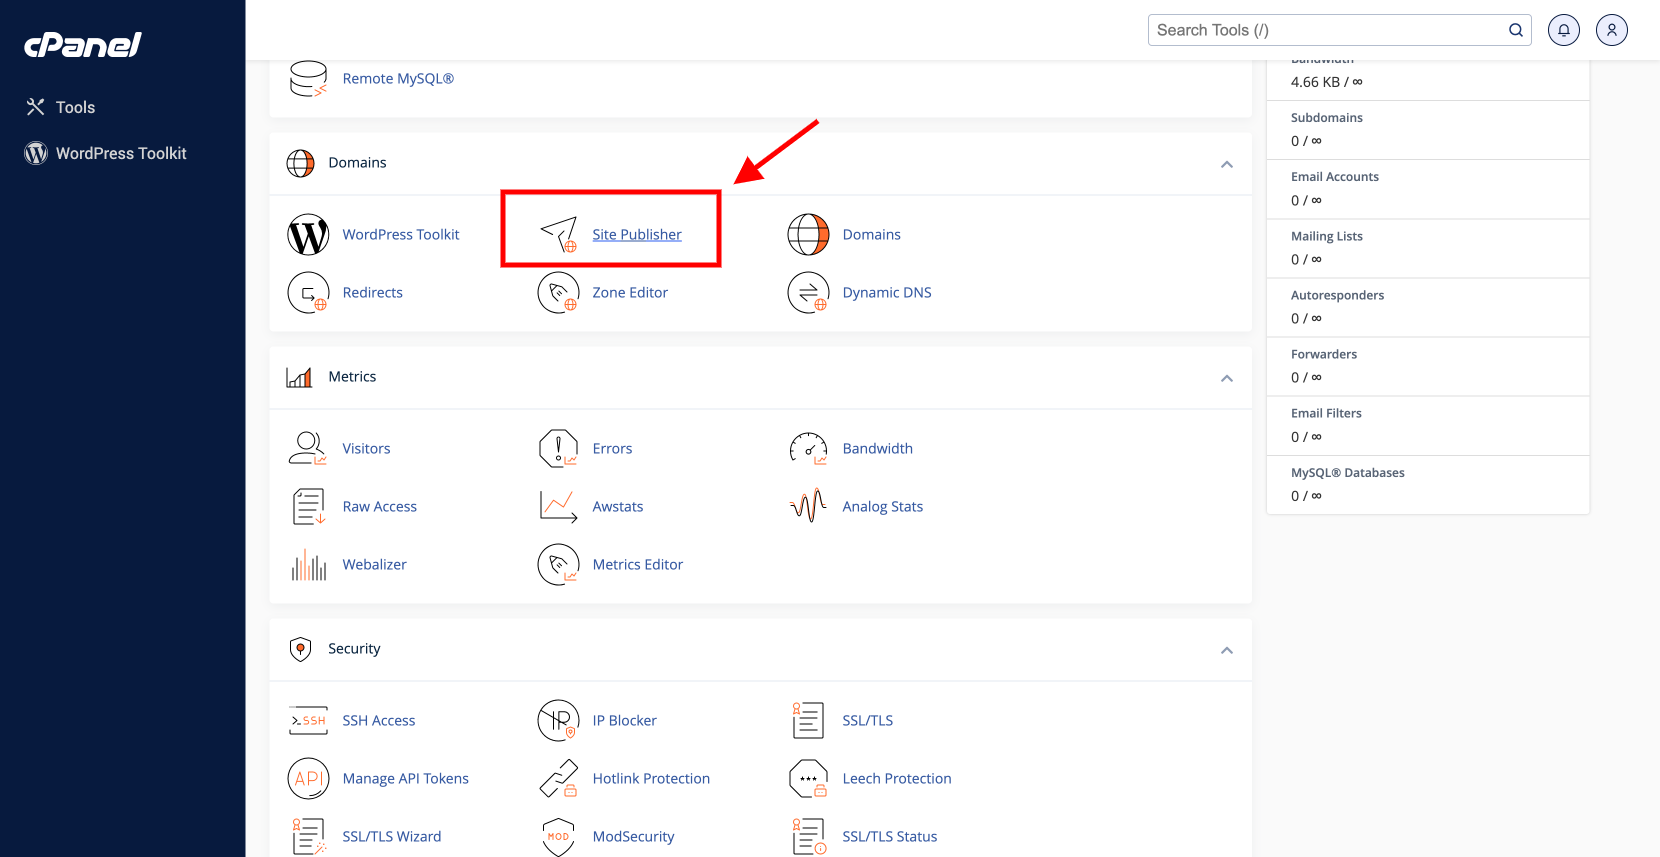
Find Site Publisher in cPanel
The Website Publisher tool can be found under the domains section.
Choose a location and a template
- After clicking the tool, you will need to select the domain or subdomain that the publisher should use.
- After you have selected the template, you will see a list of templates from which to choose. We’ll be using Under Construction.
- Fill out the details. Hit the Publish icon once you are done.
You have now created a temporary website that informs your visitors about the things you want. This is how ours looks.
Let’s start building the website by creating an email account. Your eager audience can still reach you.
Next, we will show you how to backup your website.
How to backup your website in cPanel
This is something you’ve heard over and over: backups are essential. You need to keep your website data safe in case of an emergency or move it to another location.
Even if your hosting company offers backups, we recommend that you do it yourself. Using cPanel, this is possible.
Different types of backup in cPanel
- Full account backup: You can download a backup copy of your cPanel details, including Files and DNS Zones.
- Full website backup: This will allow you to download a complete backup of your website, including the home directory and MySQL databases. It also includes email forwarders, filter configurations, and email forwarders. This is required if you want to transfer your cPanel accounts to another hosting provider.
- Partial website backup: You can select the data that you wish to back up. If you need to backup MySQL databases, for example
Full Account Backup
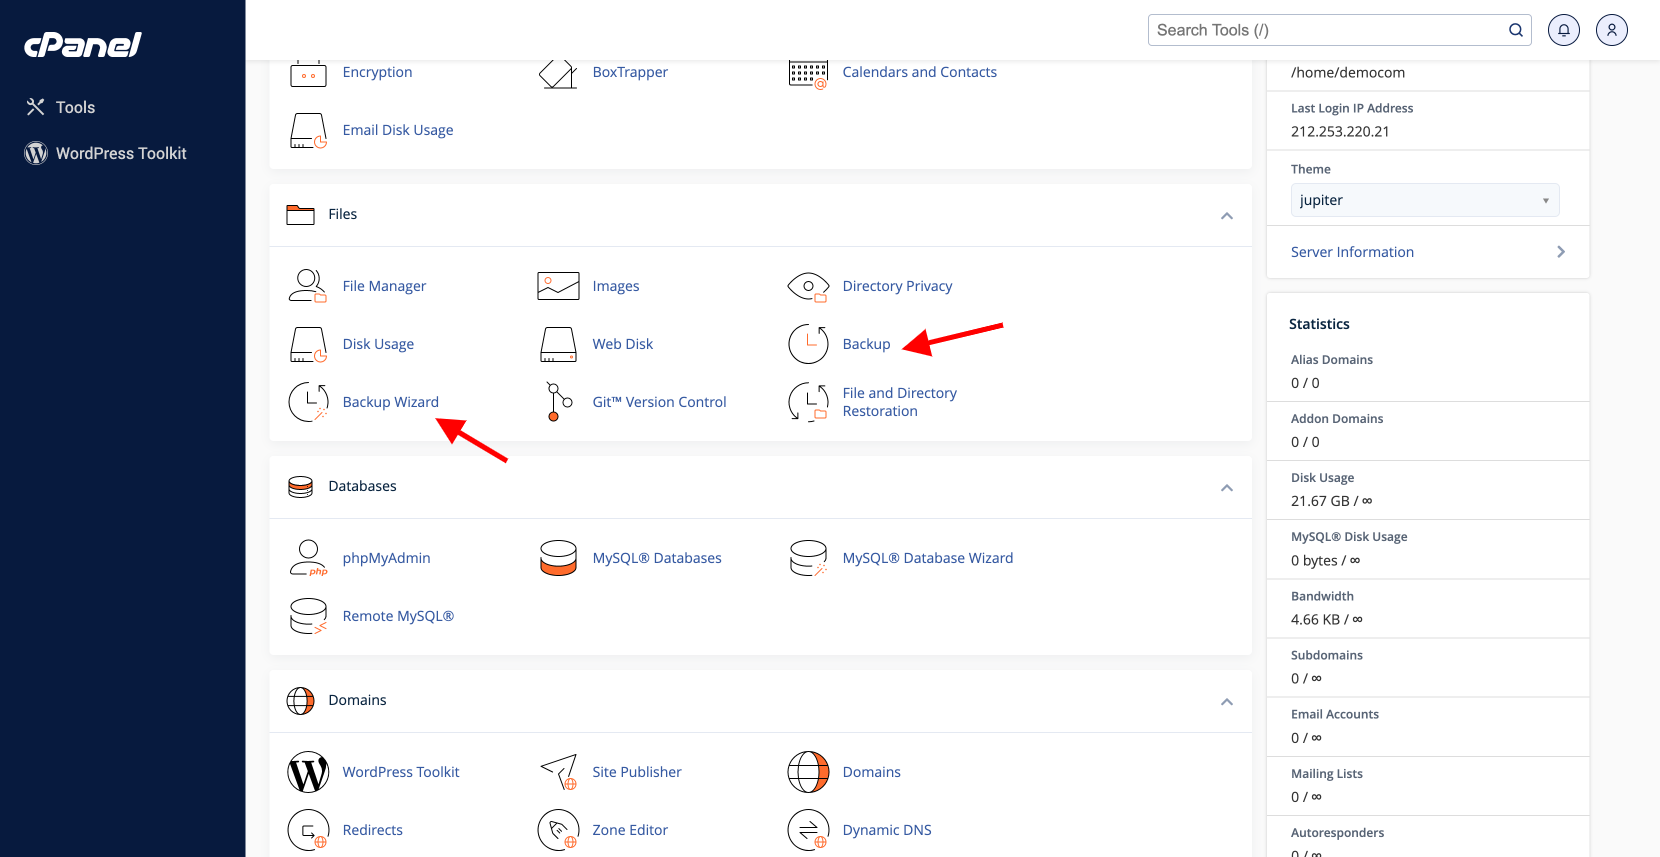
- Search and open the Full Account Backups tool from your cPanel dashboard.
- A JetBackup window opens, where you can see a list of all of your backups.
- You’ll receive a confirmation when you click the Generate download button next to the file that you want to download. Next, click Add to Download Queue and then click Return.
- After it’s completed, you will see a Download link next to the file that you want to download.
Full website backup
- Open the Backup Wizard tool by searching for it from your dashboard.
- Click Save in the new window.
- You now have the choice to perform a partial or full backup. Select Full Backup.
You can create a backup and then choose how to save it. There are four options available:
- Home Directory: Saving the file to your current server
- Remote FTP server: Use FTP to backup files on remote servers
- Remote FTP server: Use passive FTP mode for saving the backup file
- Secure Copy Protocol: Use SCP to copy the file to another server
Partial Website Backup
- Select partial backup from the Backup Wizard window.
- Once you click the link, you will be taken to the final step window. You can then locate the database file from there. To save the file, click on the link.
This is all there is to know about backups using cPanel. Three options are available that can be tailored to your specific needs.
Optimizing a website in cPanel
This cPanel complete guide will explain how to use cPanel’s Optimize website feature. This feature allows you to compress certain files to improve the performance of your website.
Find Optimize Website in cPanel
First, enter your cPanel. You can then either use the cPanel search feature to find the Optimize website tool or manually.
Using Optimize Website tool
- You can select the compression option here:
- Disabled will disable this feature and not perform any compression actions.
- All Content will reduce all content on your website.
- You can choose which type of content you want to compress by using.
- You can specify which files/content you want to compress using the MIME type field. Enter the separated list containing the content you want to compress.
- To apply the settings that you have chosen, click Update Options after making your selection. After you have made your choice, you should receive this confirmation message:
cPanel’s Optimize website function is helpful if you want your visitors to have an easier and quicker experience browsing your website. It is faster to load the website content because it is compressed before it is sent to the browser.
Creating custom error pages in cPanel
Visitors are notified when an error page is displayed. Every error is usually represented by a code number. A 404 error will be displayed if a visitor enters a URL that is not there. Unauthorized visitors who attempt to access your restricted area of the website will receive a 401 error.
Most web server software handles basic error pages. This tutorial will show you how to create your own using cPanel to display HTTP status codes ranging from 400 to 510. This option alone makes it the best control panel for VPS.
Find Error Pages in cPanel
You will find the Error Pages tool under the Advanced subsection. Locate it and then open it.
Select a page for editing
After it has been opened, you can do these:
- Managing: Here, you can choose the domain which will use the error page
- Error code List: You must choose the correct error page to make. cPanel defaults to only showing the five most frequent error pages. To see the rest of the list, click on the Show all HTTP Error Codes tab
Edit the page
After you have chosen the code you want to use, you will be taken to the editing screen. You can insert tags and HTML code here.
- Referring URL: This shows the URL from which visitors came
- Visitors’ IP Address: Displays the visitors’ IP
- requested URL: Displays the URL that visitors are trying to access
- Server name: Displays the server name
- Visitor’s Browser: Displays the type of browser the visitor uses
- Redirect Code: Displays the error code
You can play with variables to make a more custom error page. We are trying to keep visitors coming back by providing a link to our homepage; after you are satisfied with the result, click Save.
You can simulate how the error page looks by simply entering a non-existing URL, such as https://www.yourdomain.com/non-existing-url.html, into your browser.
Because not everyone understands the status codes, it’s good to have custom error pages. This is a great way to keep your visitors coming back to your site by giving them the opportunity to navigate to an actual URL.
How to Use cPanel Proxy
Sometimes an error message “IP address changed” will appear when you try to access cPanel. This message appears most often when you attempt to establish a connection using a network with strict firewall rules. You may also use a virtual private network (VPN), which occasionally changes your IP address.
cPanel does not tolerate dynamic IP addresses as a security measure. This issue can be fixed by using a customized tool, the cPanel proxy.
Remove default cPanel entries
- Log in to your cPanel Hosting account.
- Open the Area Editor tool.
- A window will open that displays a list of all your domains. Next to the domain, you wish to fix, click Manage.
- This will open a new window with a list of DNS records. Because we want to fix the cPanel login issue, the cpanel.yourdomain.com DNS record is the one to look at. It can be deleted.
Creating a new subdomain for your proxy
- Go back to the main dashboard of cPanel, locate the Subdomains Tool and open it.
- At the moment, the subdomain list should not be displayed in the Subdomain form type cPanel. All other fields will be automatically filled. Click Create. When you are done, click Return.
- The list should now show the subdomains you have created. Your cPanel linkname in the Section Root section is important as this is where you will navigate to the next step.
Download and use the cPanel Proxy
- Download the tool from the cPanel proxy website.
- Return to the main cPanel dashboard and locate the File manager. Open it.
- From the folder tree section, navigate to your cpanel.yourdomain.com. From the navigation bar, click on the Upload link.
- The new window will be opened. Drag and drop the .zip file or choose to upload it. After the upload is complete, click the Return to link.
- The cPanel proxy should now be placed in the directory. Now, extract the file. Either right-click the file to choose Extract or click on the Extract link in the toolbar.
- After you click on the Extract button, a confirmation window will appear. You can now see the execution path. After confirmation, click on the Extract File(s) button.
The cPanel proxy tool has been successfully installed. This will allow you to access your cPanel account easily. You can also log in to the cPanel window directly by entering cpanel.yourdomain.com in your browser.
How to create a Cron job in cPanel
This section will show you how to use Cron Jobs. Cron jobs can be used to automate specific commands and scripts on your website. A command or script can be set to run at a particular time each day, week, etc. To free up disk space, you can set up a Cron job that deletes temporary files each week.
Your login credentials will allow you to access your cPanel. You will then need to locate the Cron Jobs feature under Advanced.
Add an email
- Cron Email sends an email with your output if any.
Cron can send an email each time it executes a command that produces output. You can choose not to receive an email for each cron job. - This feature can be used by entering your email address into the Email box and clicking Update below.
Add a new cron job
You must fill in the following fields to add a Cron job:
- Common Settings: This dropdown menu lets you select a predefined set to use for your command. You can use this feature to set the time, or you can enter custom values in the fields below.
- Minute: This field allows you to specify the minute value at which your command will run.
- Hour: This field allows you to indicate the hour value at which your command will run.
- Day: This field allows you to specify the day that your command will run.
- Month: This field allows you to specify the month that your command will run.
- Weekday: This field allows you to specify the weekday value at which your command will run.
- Command: This field must contain the Linux command you want to run at the specified times.
This command can be used to execute a PHP script that is located in your public_html directory at specified times.
php -f /home/YOUR_CPANEL_USERNAME/public_html/file.php
IMPORTANT! You must insert your actual cPanel username instead of YOUR_CPANEL_USERNAME.
Click Add a new Cron Job button. Click the button to see cPanel successfully add the cron job.
Remove or edit cron jobs
These steps will help you get rid of your Cron job.
- Click the delete icon beside the Cron job you wish to remove.
- Click to delete.
These steps will allow you to edit your Cron job:
- Click the Edit line button to update your settings.
This cPanel tutorial will show you how to edit, remove, and add Cron jobs to automate scripts or commands on your website.
Conclusion
In this article, we talked about the cPanel definition and tried to come up with the best cPanel user guide that you’ll ever need to use when you buy cPanel VPS hosting or when you are using a VPS hosting with cPanel. There are many other features and tasks we don’t cover.
Leave a Reply